Warzone Xyphos: Minor Astartes presence

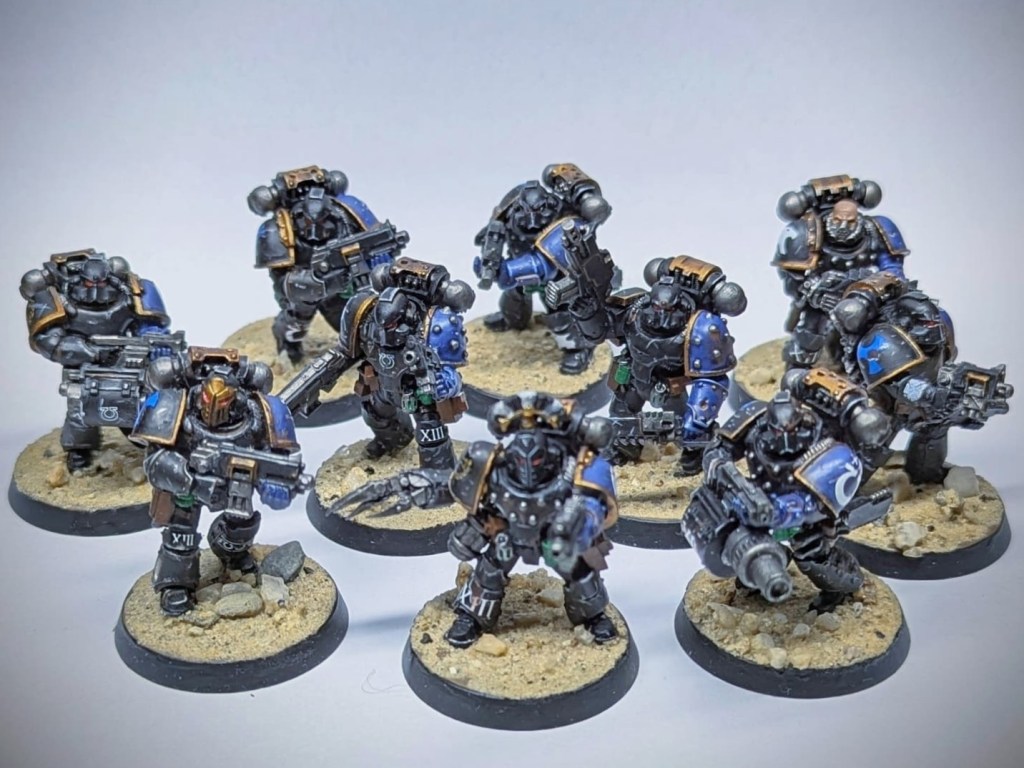
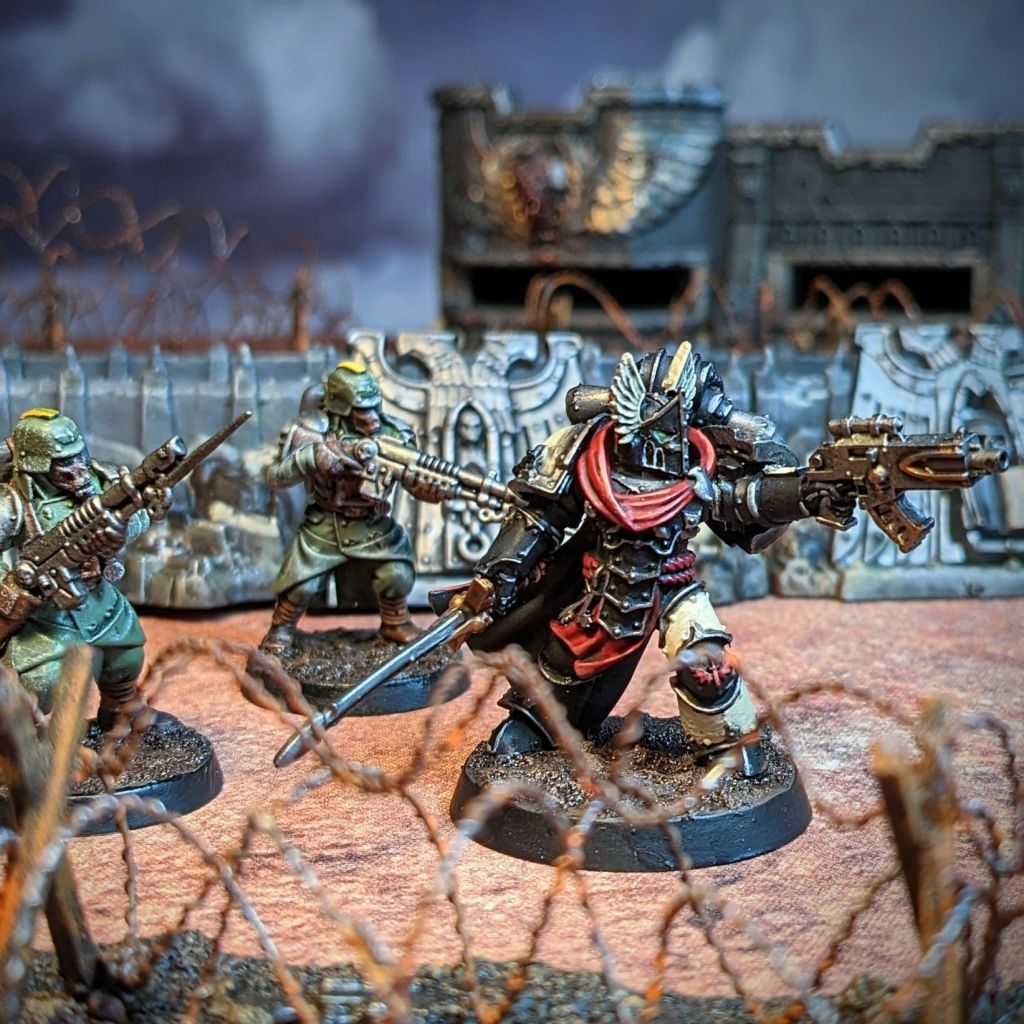
Whilst the Emperor’s Children, Raven Guard and Salamanders represented the bulk of the Legiones Astartes presence, detachments of marines and even individual battle-brothers from all the legions were present during the war in Xyphos.

The following report prepared at the request of Ghe Ven Ha, Supreme Grand Treasurer of the Xyphoneian Ministry for Logistic Affairs, in the years following the conclusion of the Great Heresy lists those confirmed sightings of Astartes, though likely many other groups also participated in the sub-sector war but simply left no eye witnesses.

Dark Angels

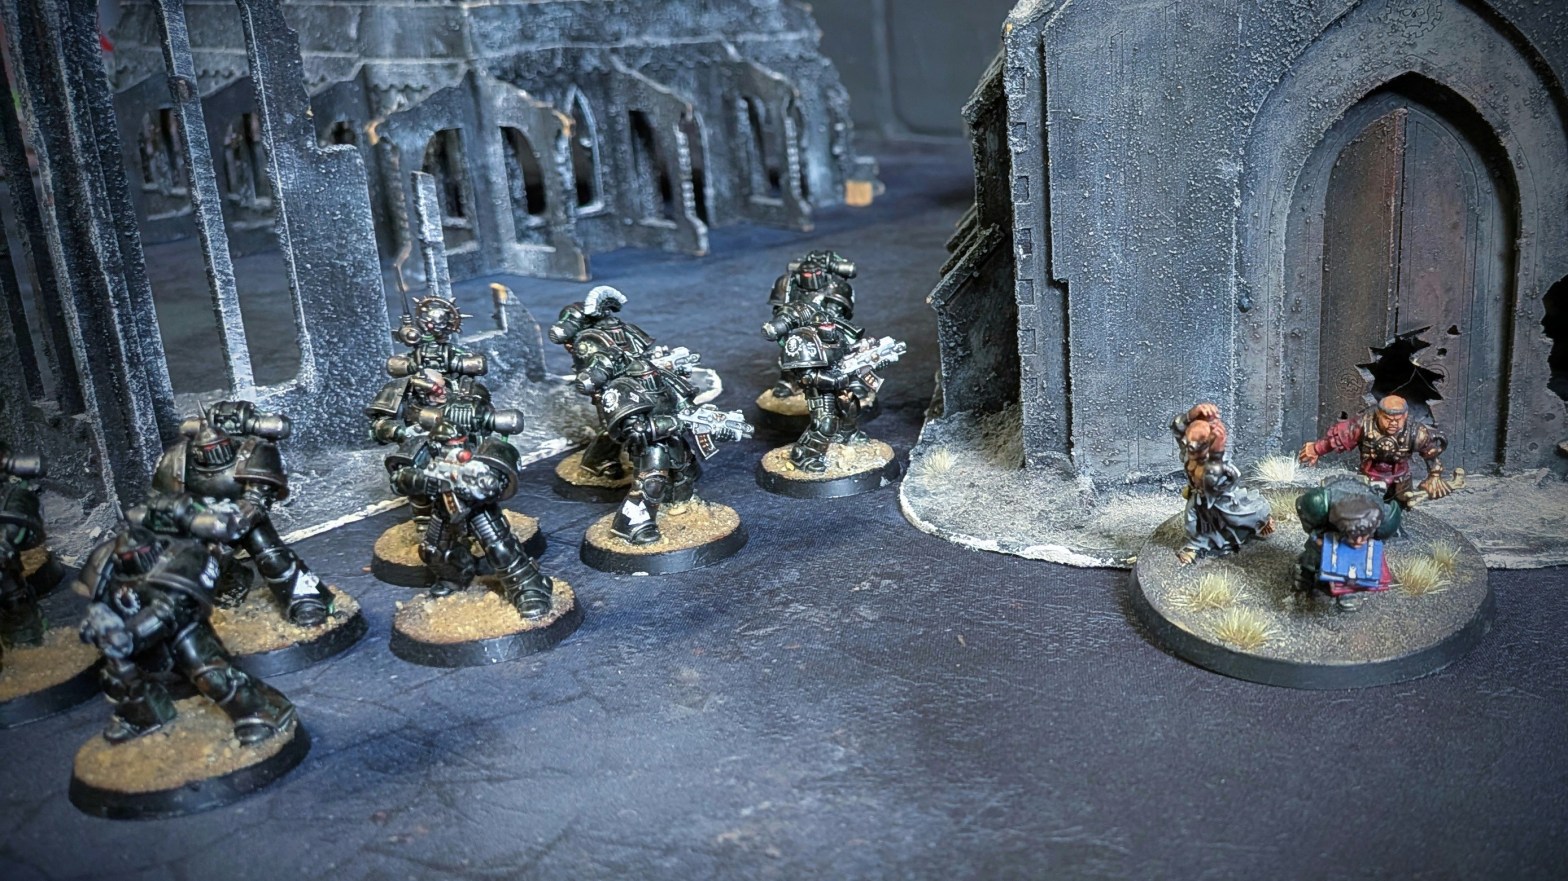
Before being folded into the 216th Expeditionary Fleet, the Saoghal siege units had fought alongside the 6th Chapter of the Dark Angels. Whilst the Dark Angels were eventually recalled to their legion, pict-recordings indicate that three Astartes remained with the Saoghal infantry well into the war in the Xyphos sub-sector. No official record can be found within the 216th Expeditionary Fleet’s order of battle and their presence is of note given the troubles caused by the Fleet’s initial status as a non-Astartes, secondary line formation.

An unidentified Dark Angels centurion fighting alongside troopers of the 9th Saoghal Siege Regiment during a raid on Persepolis.

This author can only speculate for the reasons for withholding their presence, but one clue is that the Dark Angels appeared most frequently on Eremus. A closely kept secret outside of Expeditionary Fleet High Command was that the seemingly benign world of Eremus hosted a significant subterranean weapons vault. It is possible that these Dark Angels were assigned to watch over Eremus without drawing attention of a full garrison. Given the lack of any other significance to the world of Eremus, it this author’s most plausible reason.

Iron Warriors

Whilst the main traitor fleet moved on after the initial conquest of the Zeugan System, 216th Expeditionary Fleet Intelligence Corps reports indicated a number of detachments were left behind to secure a long term traitor foothold in the sub-sector. The focus of this effort seems to have been on Persepolis, where the Sushan Line acted as a ring of steel around the capital hive. Already a formidable defence network, it appears to have been fortified considerably by the traitors.

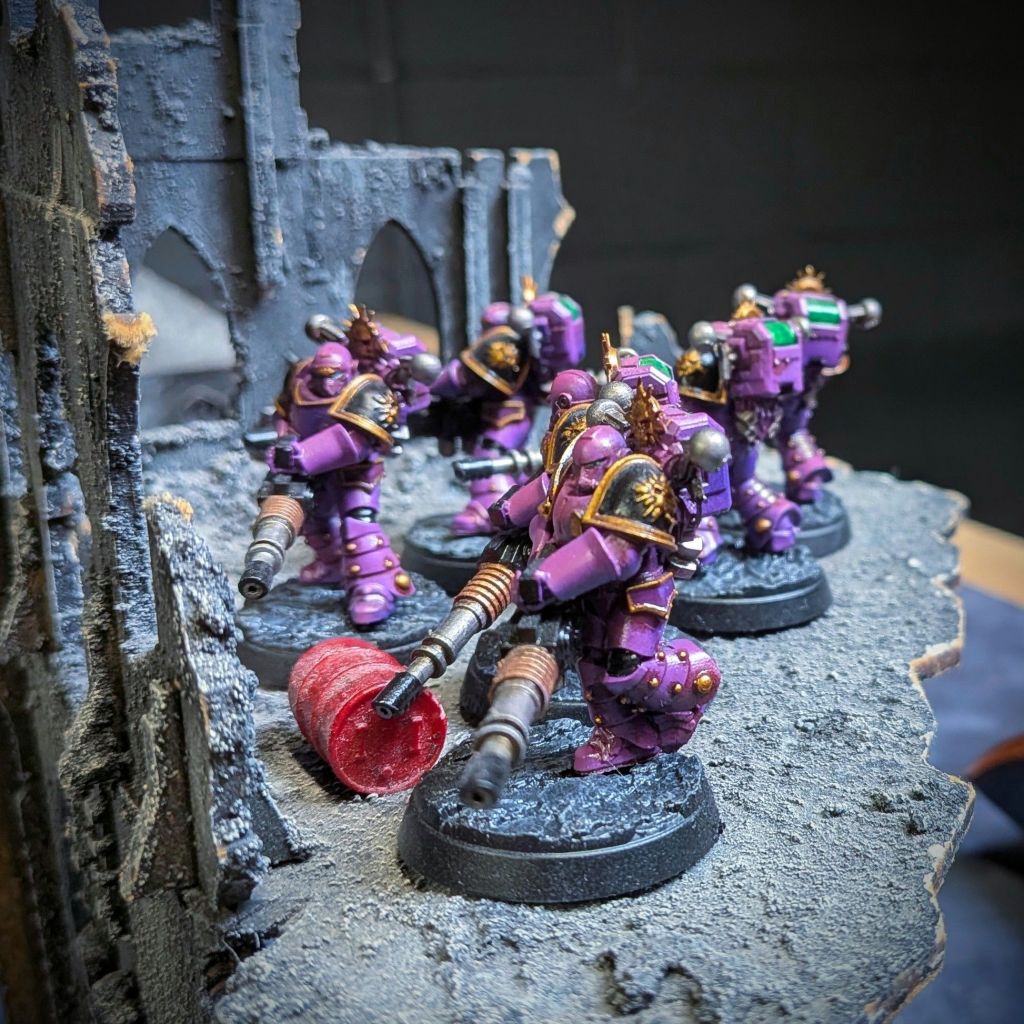
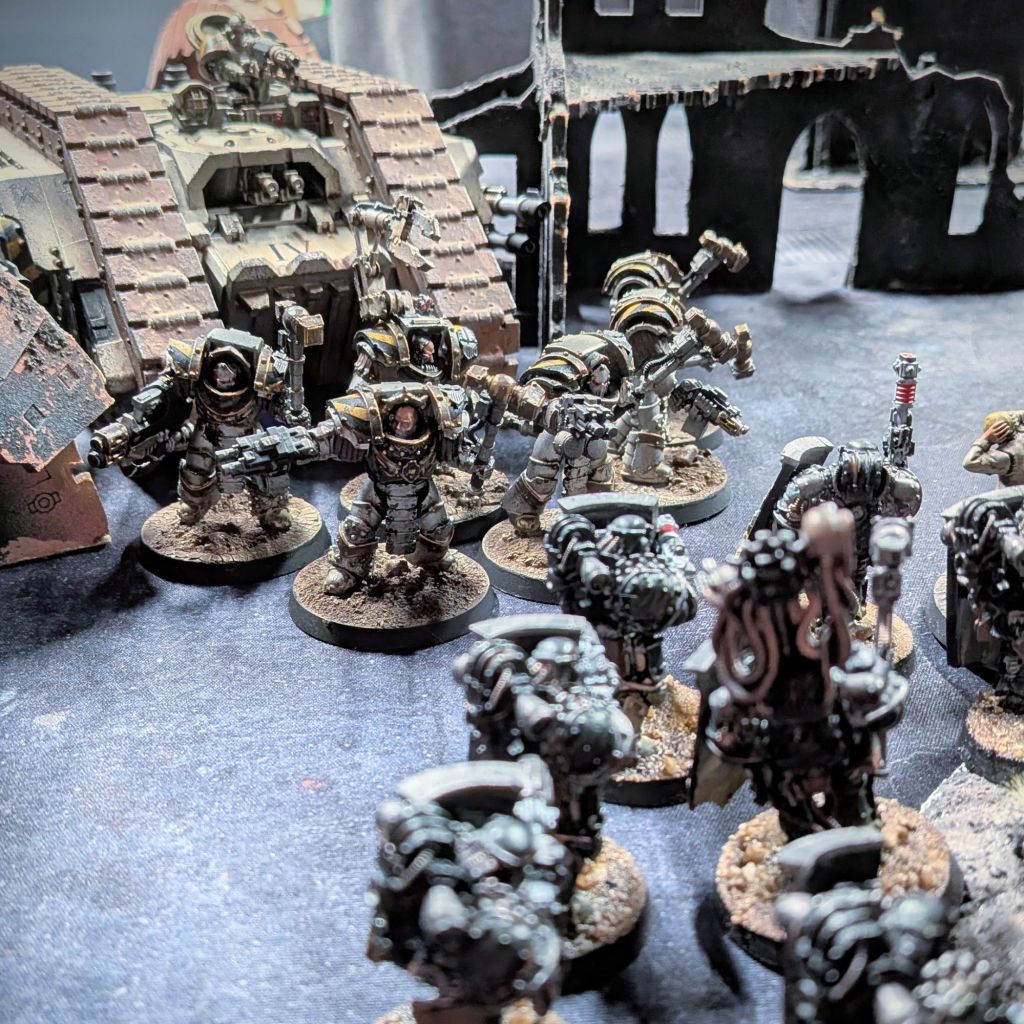
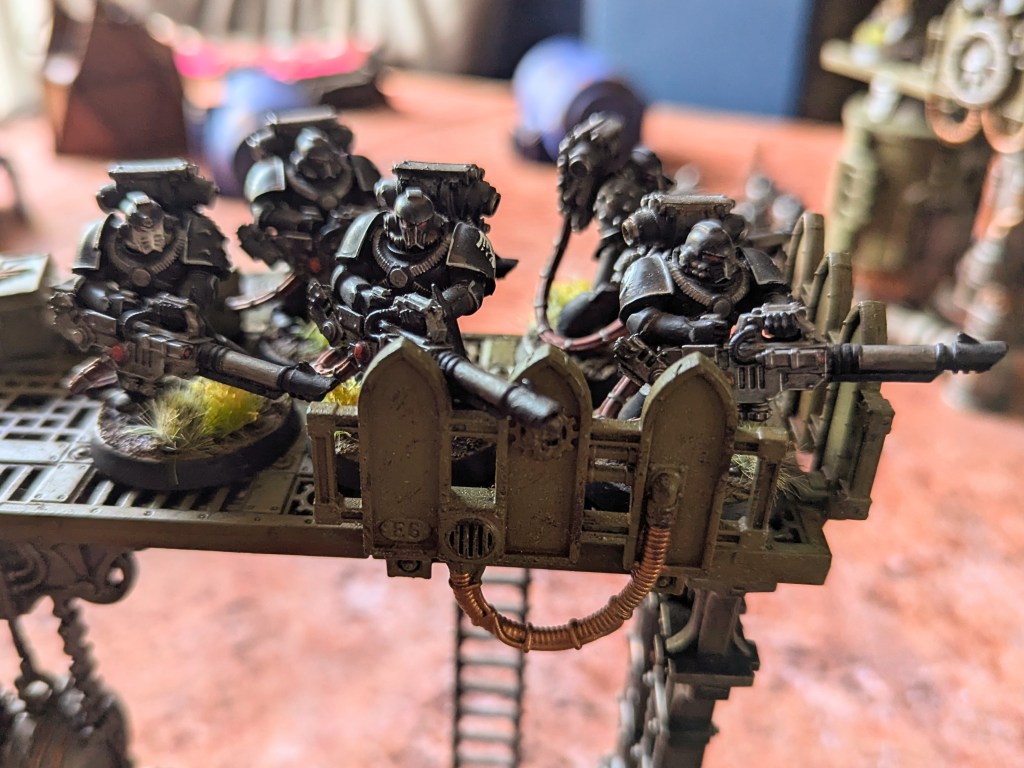
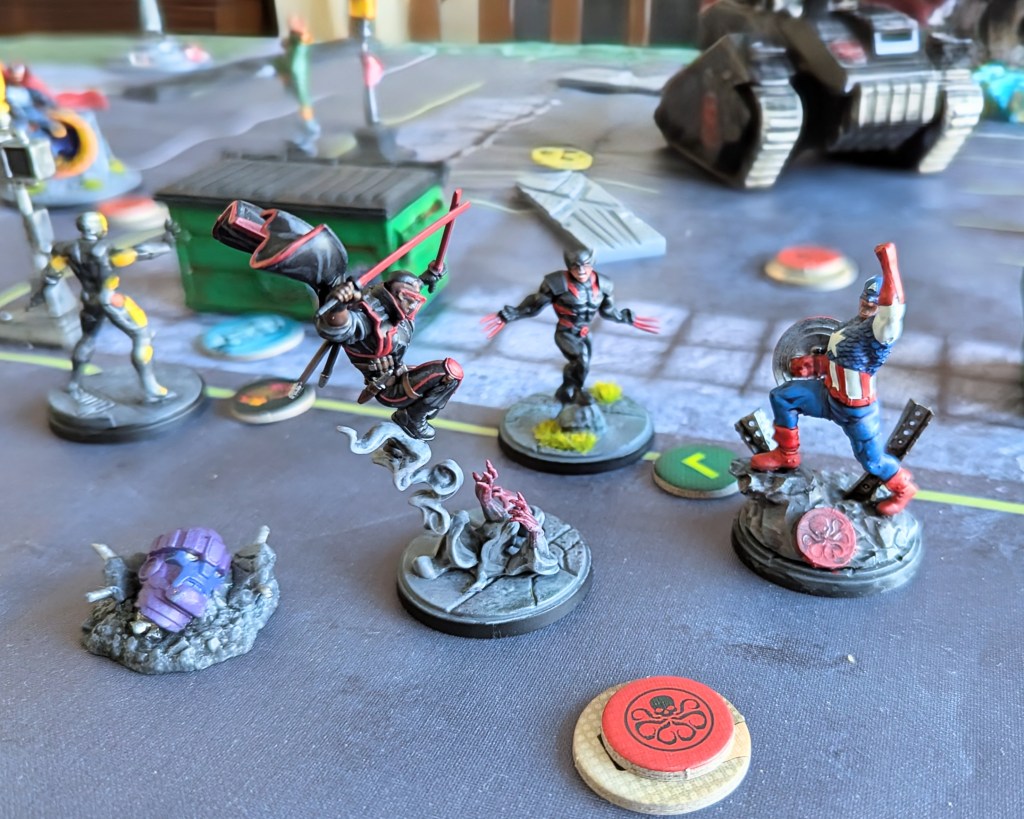
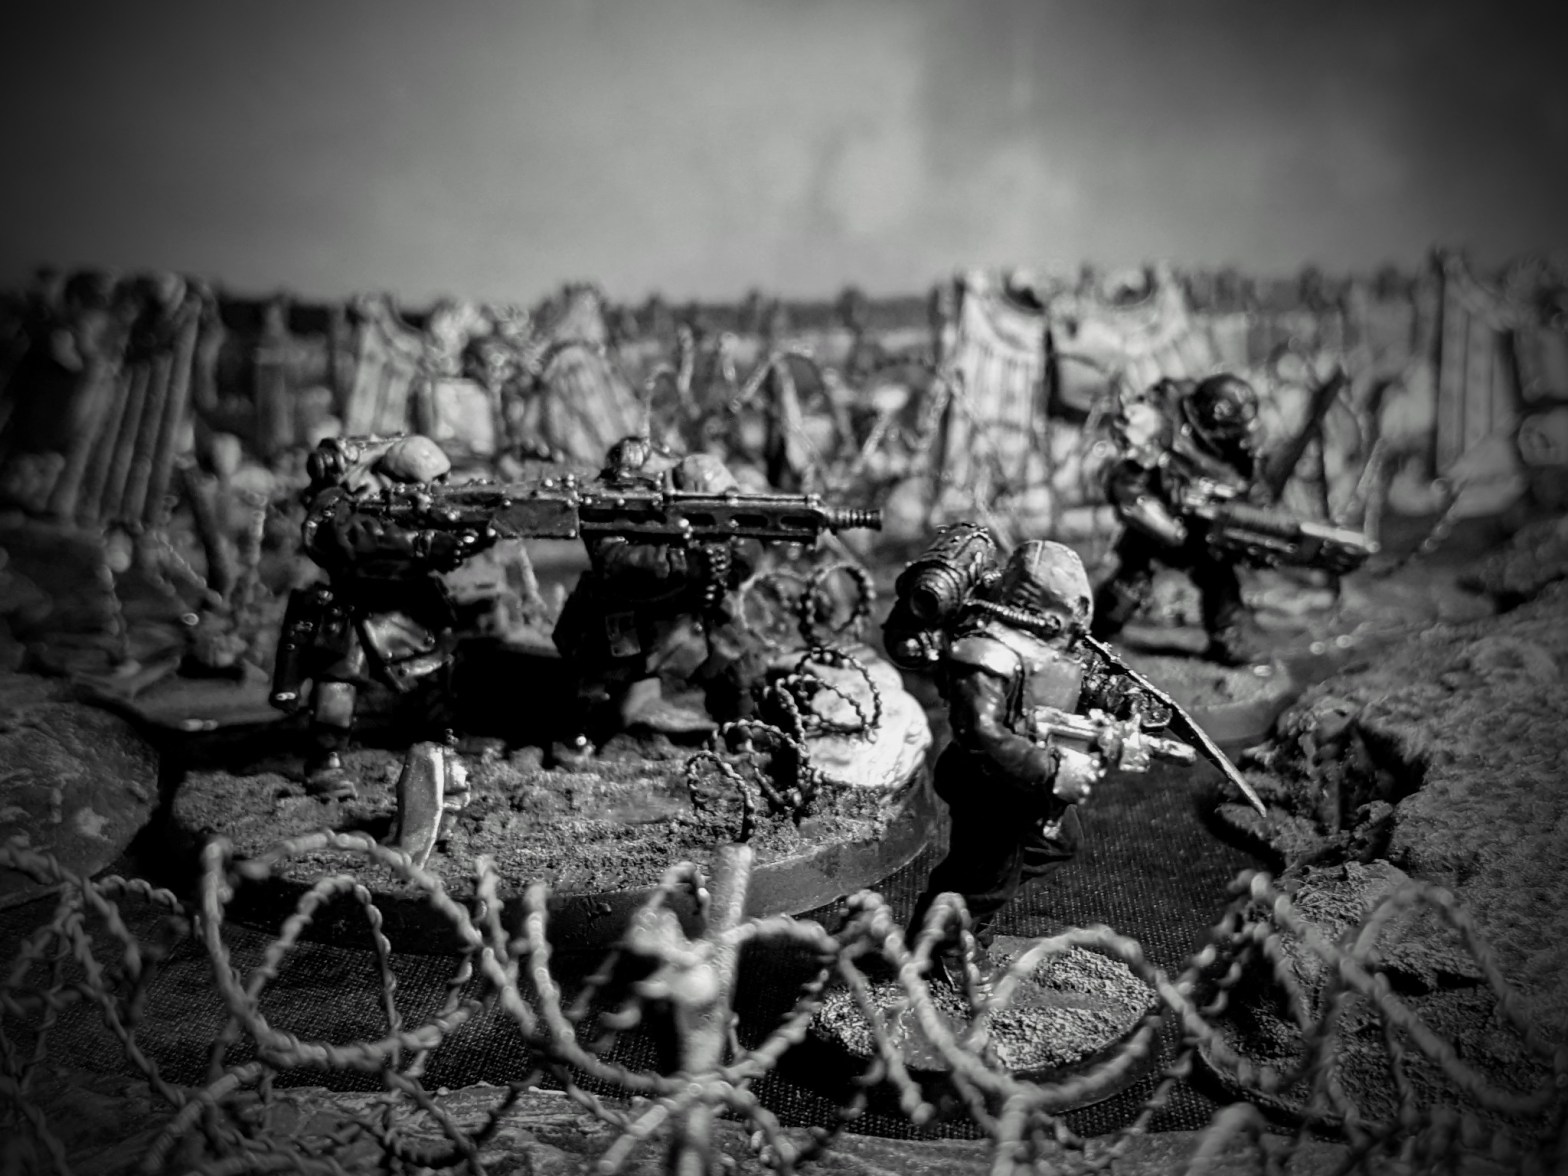
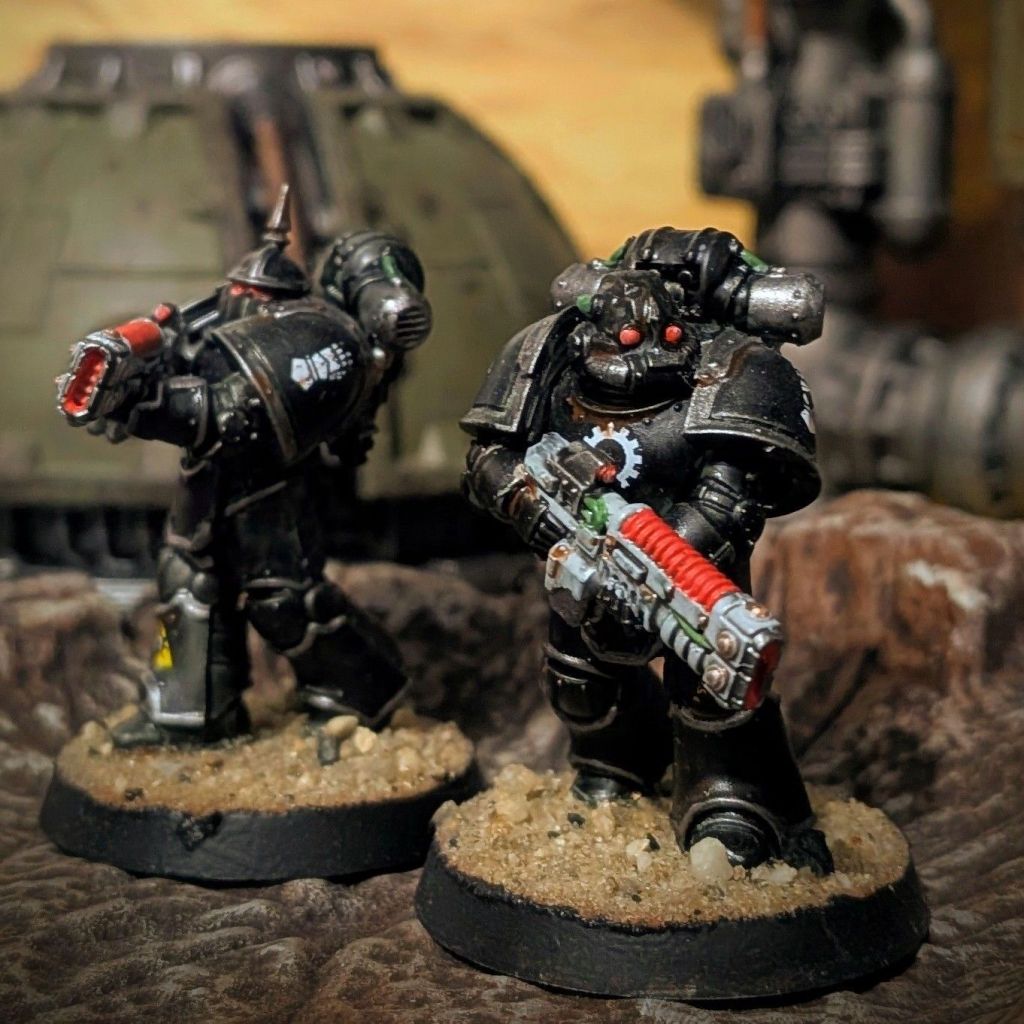
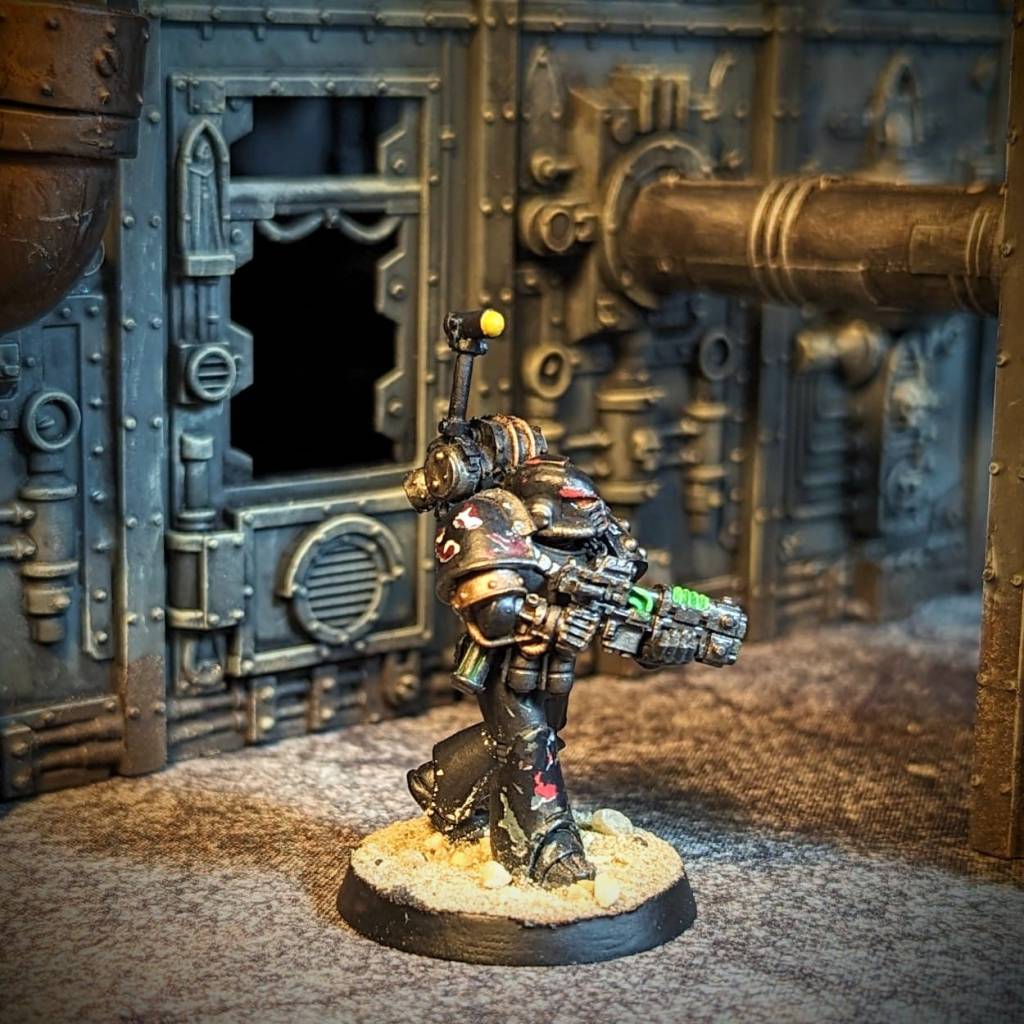
The below pict recording shows an unidentified member of the Iron Warriors legion directing several members of the Vashdarii in their back-breaking work establishing a supply dump. The Iron Warriors moreso than any other legion had millions of mortals whose lives were entirely at the whim of their post-human tyrants.

Although it is not possible to identify the specific legionary given the Iron Warriors‘ disdain for personal ornament, the pict does reveal some information about them:

  • He wields a Sagaris which suggests he is a native of Partsus, which was an uncommon recruiting world for the IV Legion.
  • His green kneepad suggests he was a member of the 444th Grand Company, which conflicts with numerous accounts of the 444th Grand Company fighting in the galactic north-east. Several reasons are possible for this. It could be part of a wider false-flag scheme to exaggerate traitor numbers in Xyphos, this legionary may simply be on assignment to another Grand Company, or he could be a lone survivor spat out by the chaos of the war who ended up being folded into another unit.
  • He is likely a member of an augur command and control squad based on his modified Mark III armour with a non-standard backpack. Fitted with additional battery capabilities, this allows a better integration with the logistic nexus and tacticae screens required to operate chapter-level warfare. Being so power hungry, such devices are usually reserved for command level vehicles such as the Damocles Rhino or Leviathan command vehicle. As Iron Warriors preferred to use a “portable” version which necessitated extra power provided by the user. 
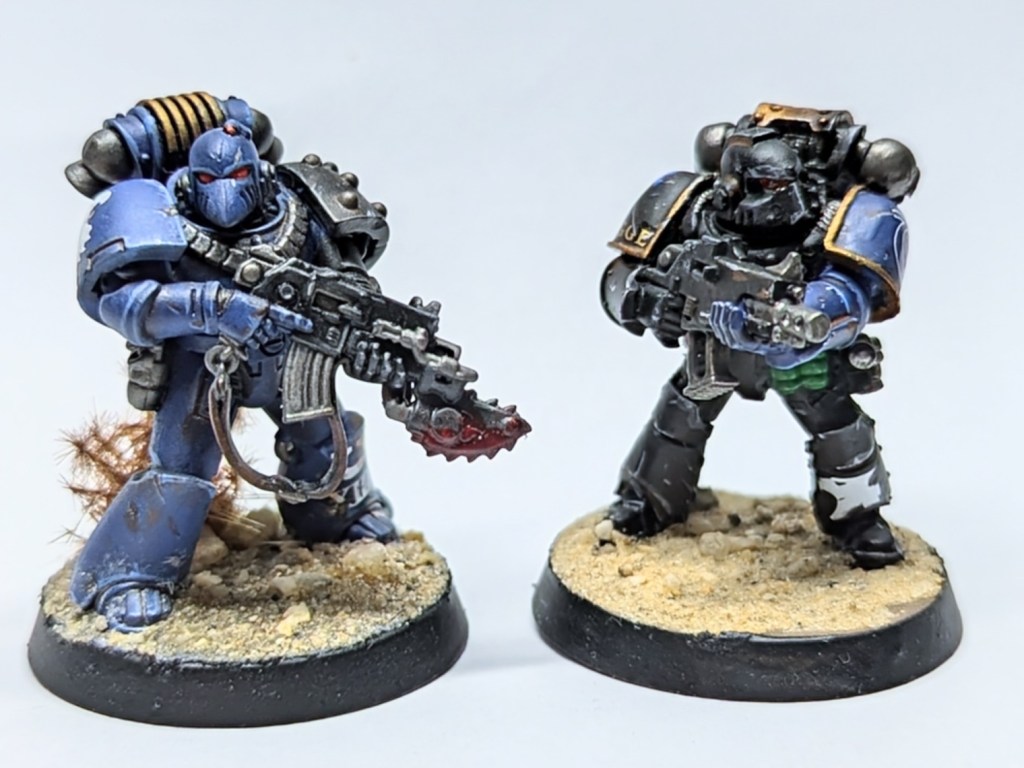
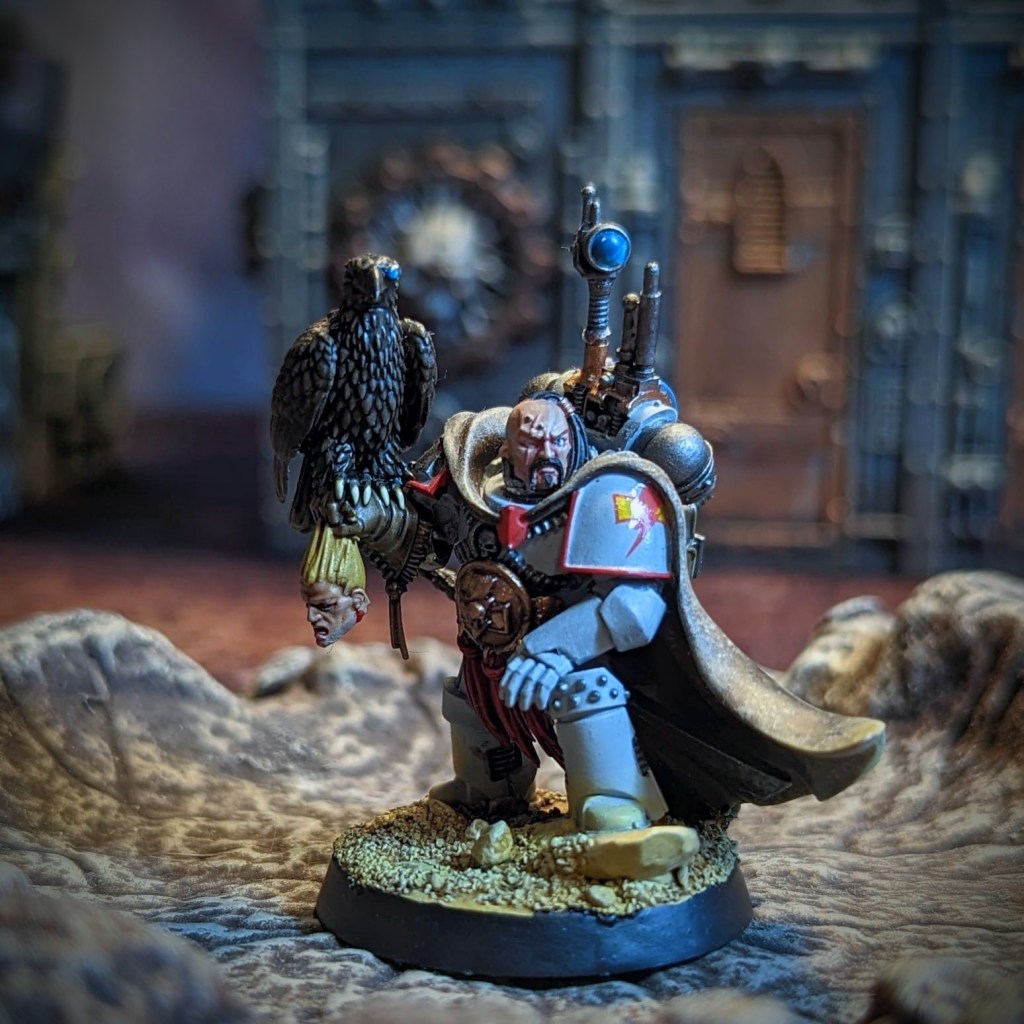
White Scars

Records indicate that Khoisan Hugalu was present during the Chogoris campaign. His cruiser was ambushed by an Alpha Legion kill team after being scattered by a Warp Storm. Khoisan was the sole survivor due to a last minute escape pod jettison. He landed on Cal X, a loyalist frontier world, and decided to do whatever he could to return to his gene father. Records indicate his drawing a number of idiosyncratic imperial army units to his side after re-commissioning a Sword Frigate.

Khoisan Hulagu, the ‘Mantis Warrior’s, Ordu of the Maurading Shadow

Whilst studying V Legion records is difficult due to the opaque cultural practices of Chogoris, the following excerpt was found on a discarded dataslate and appears to be an account from Khoisan himself:

My name was Eirche of the Greenol. I fought alongside the Emperor on Terra and a dozen other worlds. I was a pathfinder, a raider, a slayer of demagogues. I was a Star Hunter.

Eirche of the Greenol died at Quan Zhou.

Khoisan Hulagu was born during the Blooding. I scared my face as the Talaskar do and swore my oath to my gene-father. I am the bow, the mantis warrior, the dawn’s fire. I am of the Ordu Jaghatai.

Khoisan and his detachment ended up in Xyphos, where they were incorporated into the loyalist army. However, unlike other Astartes units that were dispatched to fight the traitors front on, Khoisan put his pathfinding skills to the test. He performed a key role in identifying other routes in and out of the Xyphos Sub-sector other than the Freeman Passage.

Alpha Legion

The presence of legionaries from the XX legion was disputed for much of the Heresy, with reports of marines in shadow armour on Hephaiston dismissed as misidentification of other, loyalist units. However, following a sub-sector wide data audit during what was to become known as the Scouring, a number of instances of Alpha Legion forces were corroborated. This includes the grainy footage on Orbital Station Noctra & the catastrophic opening blow on the defences around the Freeman Passage. It is still unclear what the Alpha Legion was doing in Xyphos, or how many marines were present. Most accounts of the Alpha Legion show them from the main fronts, and often in seemingly contradictory operations.

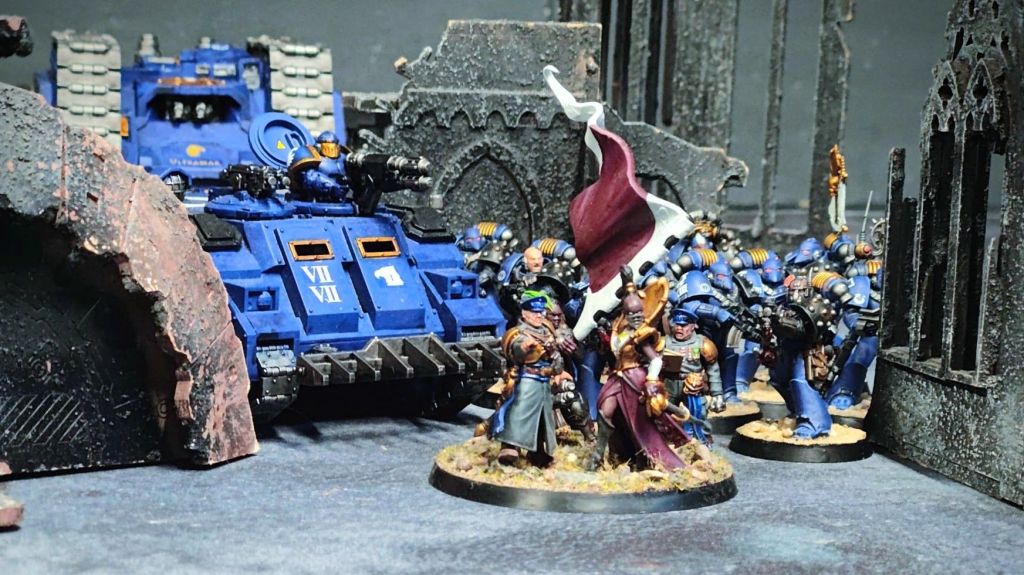
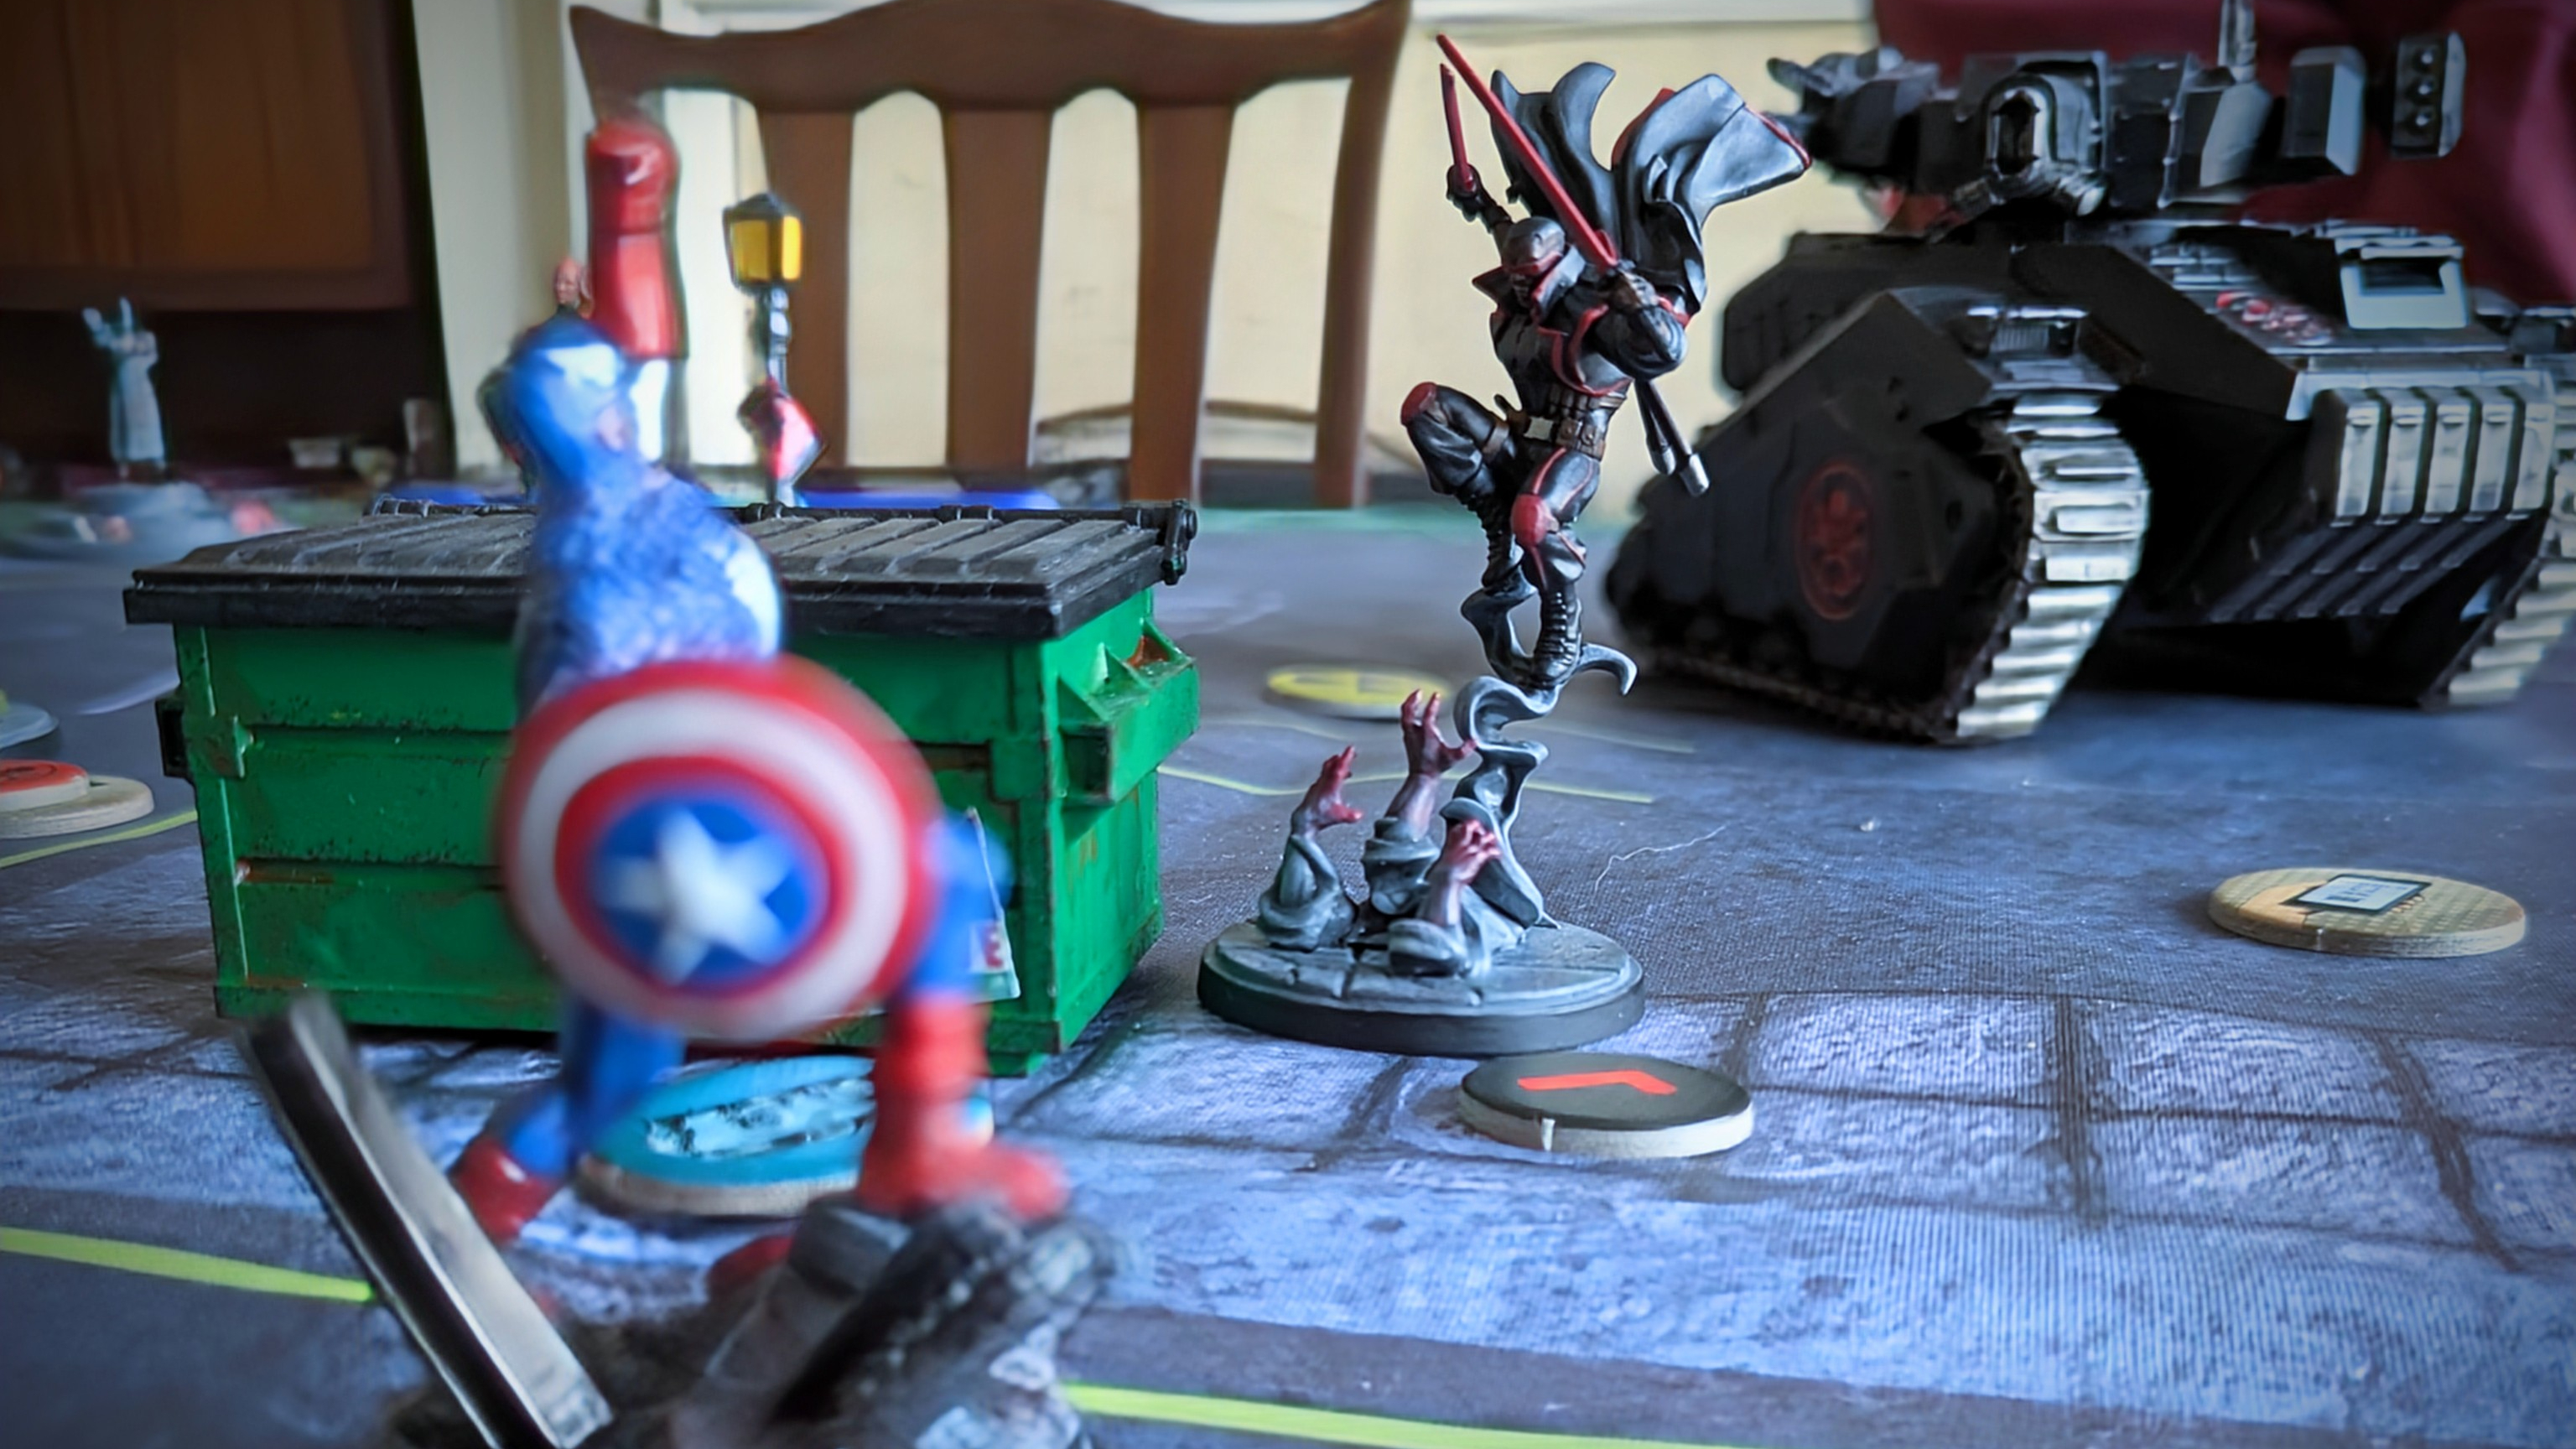
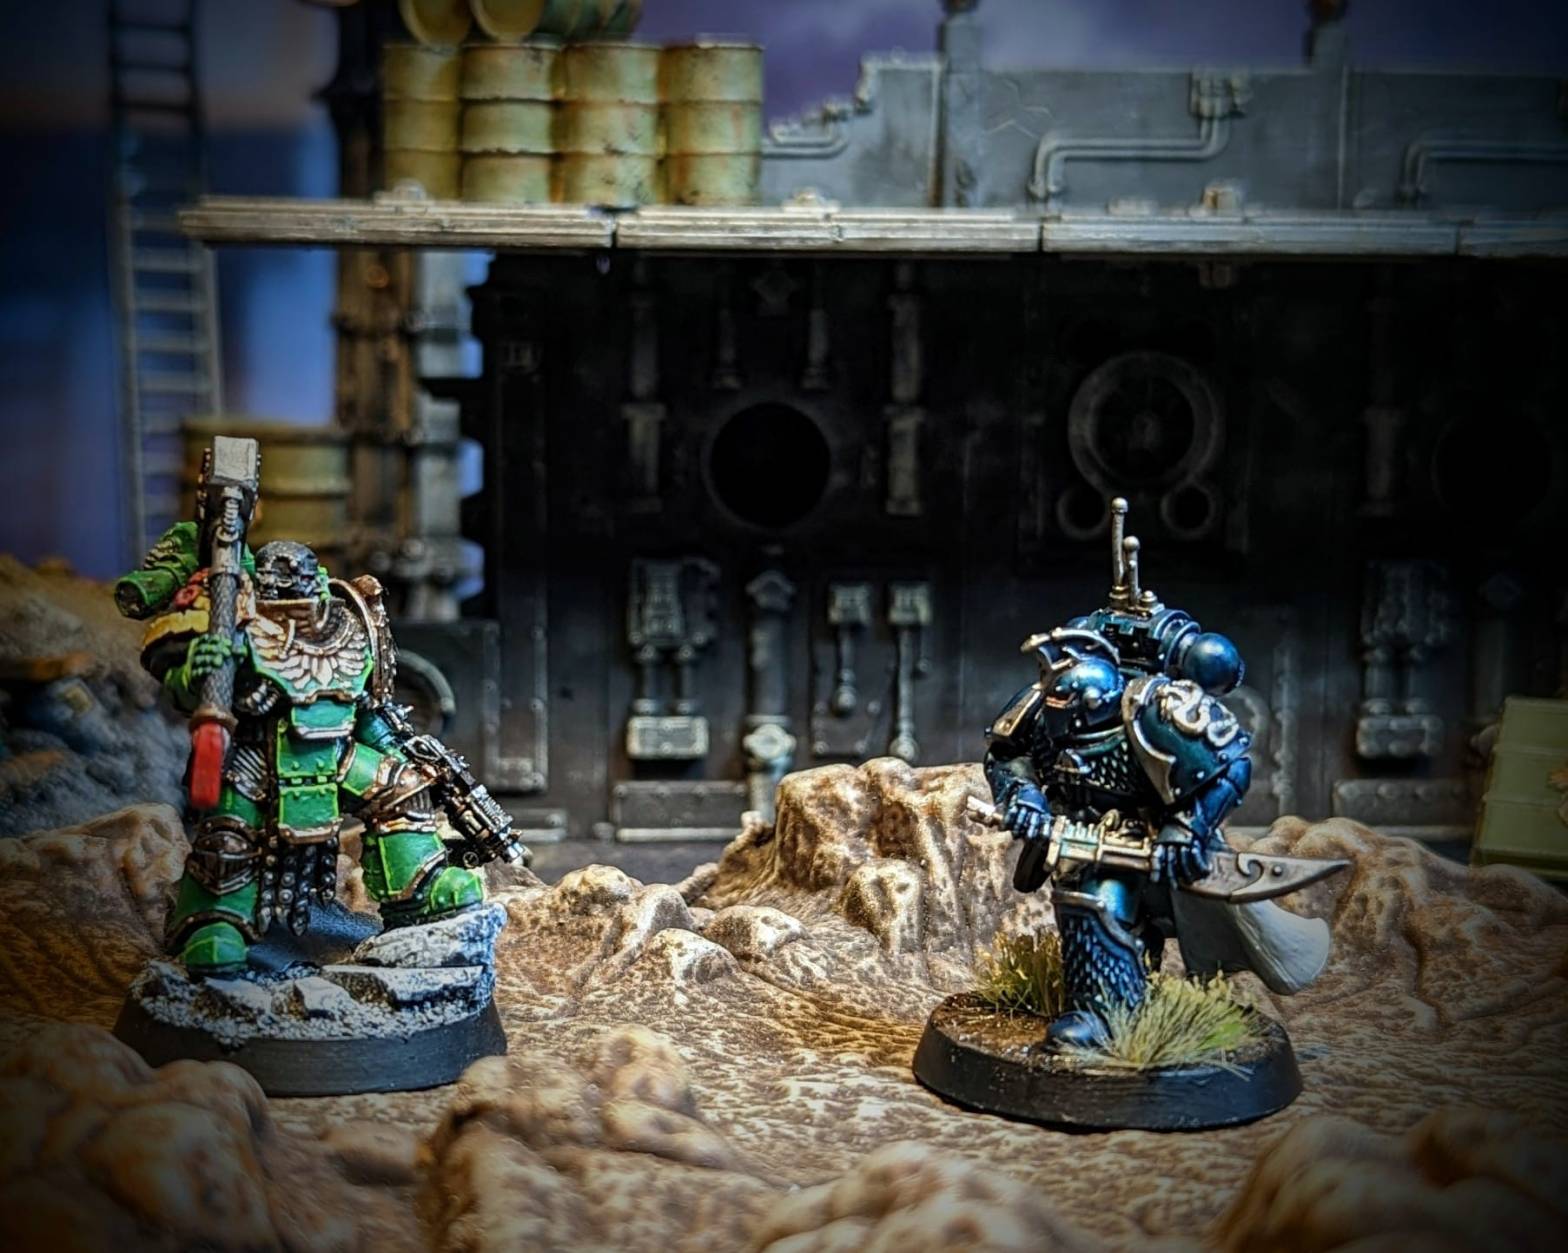
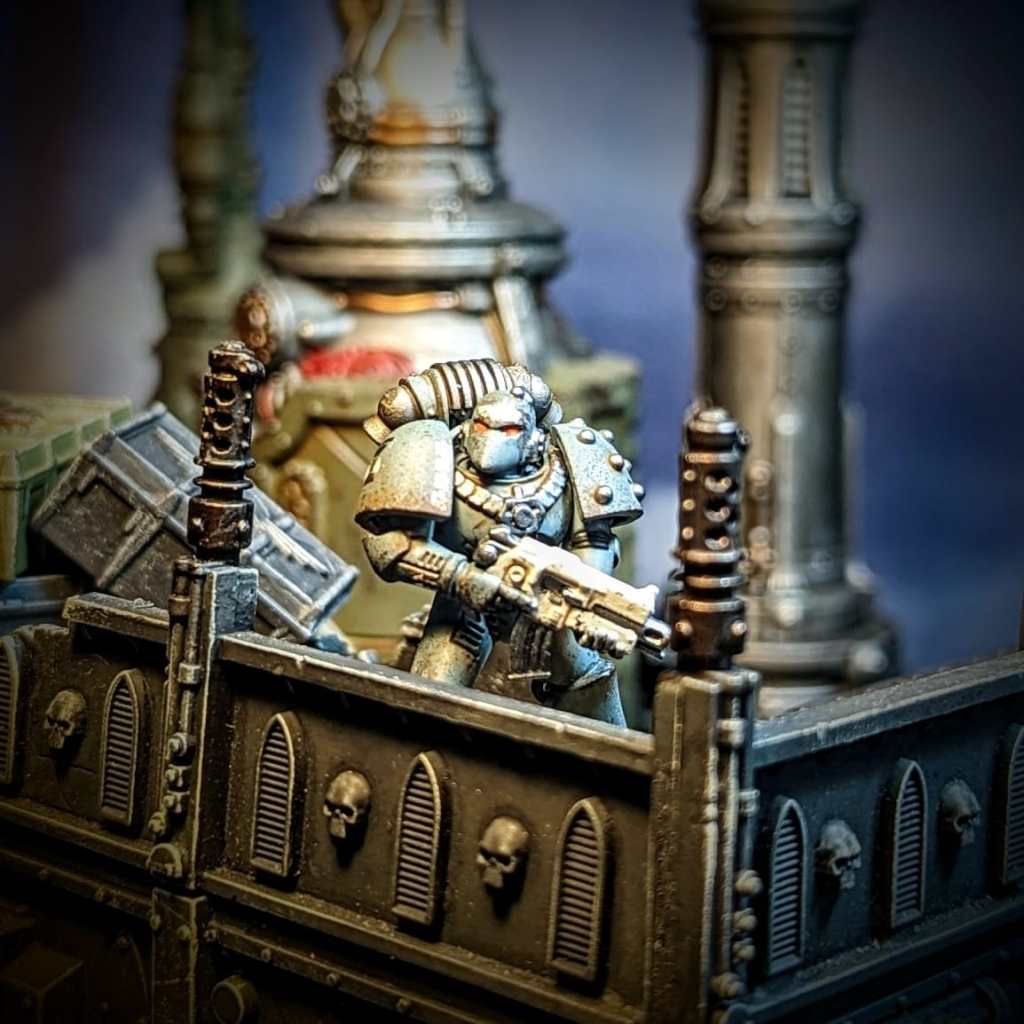
The above pict recording shows Imrik of the Salamanders 13th Chapter fighting an unidentified Alpha Legionary. This author presumes that must be a high ranking official based on the armour’s ornamentation. However it is impossible to say for certain given the Alpha Legion’s preference for misdirection and the absence of any other markers.

The specific outcome of this dual is unknown because only corrupted footage exists, but given Imrik’s heroic deeds well onto the Second Founding, it is believed that he must have won won. It is of note that Imrik made no mention of this dual in any reports.

Iron hands

Fleeing Isstvan V, the shattered legions took whatever steps needed to get to a modicum of safety. Though most of the Avernii clan of the Iron Hands fell on the black sands, Iron-Father Luumik Yvald managed to extradite himself alongside a contingent of Ordo Pentarii before escape was rendered impossible. Instead of regrouping with the remainder of their legion and walking into Tybalt Marr’s trap, the warp spat Ordo Pentarii out in Xyphos.

Centurion Sjargan Vanjoidh had taken command due to Luumik’s nascent psychic powers being unleashed on Isstvan V and being deemed unfit for command. Whilst the Iron Hands looked on psychic arts with suspicion at the best of times, the fact that Luumik’s powers manifested spirits of those dead on Isstvan V greatly unsettled his fellow legionaries.

Sjargan refused to submit to Octavian’s authority under the Supreme Headquarters Loyalist Forces Xyphos. Instead Sjargan took the Iron Hands to pursue their own agenda of killing traitors wherever possible, in particular on the 22nd Millennial of the Emperor’s Children.

This cohort of Ordo Pentarii were last seen defending the world of Sanewor alongside a banner from House Makvar in 014.M31.
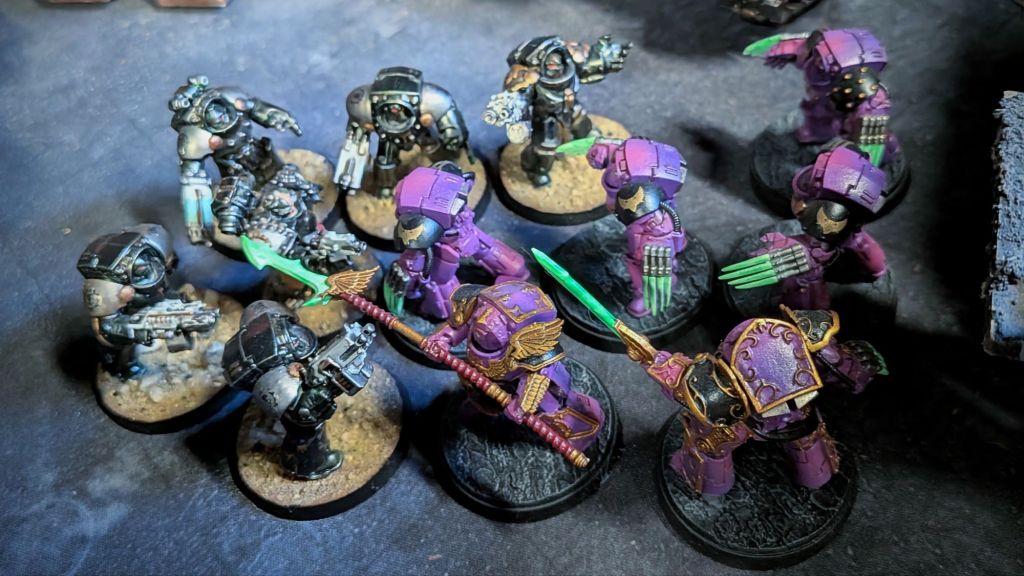
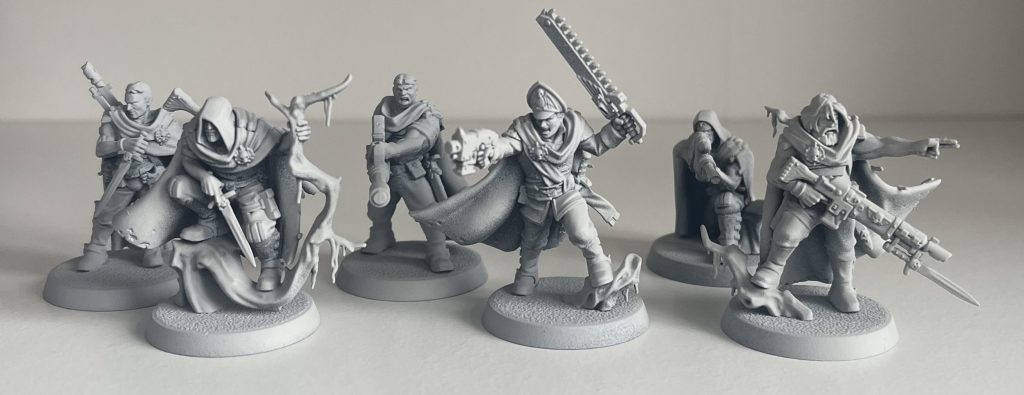
The Noosemen

A unit calling themselves The Noosemen first identified themselves on Jemerq’ua. They arrived in a light cruiser that orbital stacks flagged as the Dragon Claw, recorded as lost on Isstvan V. However most traces of this ship’s former life in the Salamanders legion had been scoured clean. Each marine’s armour was painted black and they had no discernible markings.

One of the few snapshots of a member of the Noosemen on Jemerq’ua. The black armour is clearly identified here, but battle damage reveals snippets of Thousand Sons, Space Wolves, Word Bearers and Emperor’s Children heraldry. Whilst one of these could reveal the marine’s original legion, it is more likely that his armour is the result of substantial battlefield repairs.

After massacring the Imperial Army defence force stationed there, raiding the munitions complex and publicly hanging the entire royal family from the main spire, the marines simply left. Their only legacy was a brutal civil war and the following vox broadcast:

Betrayed by one father, abandoned by another. We are masters of our own fate.

Adore us. Loathe us. It matters not.

All that matters is you kneel.

Vox broadcast stemming from the main hive on Jemerq’ua.

Numbering only 34 marines, the Noosemen would continue to cause havoc in Xyphos despite their size, attacking both Traitor and Loyalist forces alike. The focus of their attacks seem to have been two-fold: (1) executing planetary governors and other leadership figures; and (2) press-ganging arms, armour and recruits.

Their fate post Heresy is unknown to this author despite months in the Alexandrian archives.

The Unresolved

This group appears to have gained its name after an Administratum official labelled the first pict recording of these marines as “Unresolved Astartes“. Subsequent appearances indicate a force of some three hundred marines, with limited armoured support.

Although each marine had an aquila stamped on their forehead, it is difficult to class these as a truly loyalist asset as they have refused any communication through both Supreme Headquarters Loyalist Forces Xyphos and civilian channels. It should be assumed that any allegiance to the loyalist cause was nominal at best.

Like all marines in the Unresolved, this astartes’ armour is not painted, with the bare ceramite still showing the serial number and Mechanicum smithing marks. The only piece of heraldry was a weeping chalice on his right pauldron, and although this did not directly match with any known legion iconography, the chalice is often associated with the Blood Angels, a possible hint to the geneseed origin.

What primary sources this author was able to find report them as ‘monstrous and savage fighters’ who, once they joined the battle, tear apart everyone in front of them. Perhaps disturbingly, we have had reports of the Unresolved feasting on corpses after a firefight, but this has not been corroborated by an pict recording and so this author dismisses this as hyperbole.

Dicing with Death: The Trap on Moross

Moross became a frontline system following the Traitors’ conquering of the Perditian and Zeugan systems in Xyphos.

The planet was deemed a possible vector for a traitor assault and so by early 009.M31 it had a reasonable garrison including Ultramarines of the 77th Company. Additionally, 19th Corps from 216th Expeditionary Fleet was planetside, acting as a bodyguard for General Sheev Verox who was assessing the planet’s defences.

Fortuitously, a detachment of Iron Hands from Ordo Pentarii, Clan Avernii was also present. As recorded elsewhere in this chronicle, the Iron Hands refused to submit to Horatio’s sub-sector theatre command. Instead is understood that they were merely on Moross to refuel and rearm ahead of a planned probe into the traitor-held Zeugan System.

First assault

Vox missives recovered from traitor forces indicate that Julius Kaeseron chaffed under orders to wait in orbit. Instead Kaeseron took his millennial planetside, launching an assault on the capital hive from several Stormbirds. These burst into the upper hive, disgorging their inhabitants to begin pillaging, massacring and capturing slaves.

Whilst most of the Emperor’s Children threw themselves into the melee, several assets were seen to be holding back, choosing instead to cause devastation from afar. These Sunkillers reaped a heavy toll over the loyalist armour.

It is interesting to note that the traitors were not the only faction to struggle with obeying orders. Clan Avernii had suffered greatly on Isstvan V under the Emperor’s Children. It was no surprise then that, on receiving vox-reports of purple and gold marines in the upper spires, the Iron Hands abandoned everything else to pursue their most hated foe.

Kaesoron could not restrain himself on sight of the Iron Hands and took great delight in carving up terminators from Clan Avernii.

The two forces clashed in a brutal melee, with no quarter given or asked for. Iron Hands who had endured countless nightmares on Isstvan fell here in a remote corner of the galaxy, whilst disciplined volkite fire cut down howling palatine blades. The fight was even until the Iron Warriors arrived, Warsmith Draxion committing to the assault out of necessity to try to carry the day.

The arrival of the Iron Warriors came as a surprise to the loyalists, who were unable to react quickly enough before several armoured assets were left smouldering wrecks.

It was everyone’s surprise when sable armoured marines uncloaked themselves from the ruins and began firing on the traitors. These Raven Guard had been dispatched unbeknownst to anyone else and had chosen the perfect time to appear. The traitors could not match the cold aggression of this new foe and so retreated from the city centre to consolidate and recover.

Arrias Cordos, newly elevated captain of the 77th Company, personally slew multiple Emperor’s Children leaders in a brutal combat.

+++8th Talon access codes accepted+++
+++Data Inload Code Rose+++
+++Supplemental Orders from Supreme Headquarters Loyalist Forces Xyphos+++
+++Re-route to Moross+++
+++EFIC information indicates possibility of Horusian forces assaulting this system. Confirmed through astropathic somnal scouring+++
+++Primary Objective: Keep General Verox alive, extract if required+++
+++Secondary Objective: Secure Xenoflora samples from Hegian Research Base+++
+++Tertiary Objective: Defend Moross+++
+++Your authority is above General Verox and HLFM+++
+++For the Imperium+++

Whilst overwhelmed, Centurion Vanjoidh would survive and, following some reconstruction, took command over the remainder of Ordo Pentarii.

Headquarters Loyalist Forces Moross:

Theatre command: General Sheev Verox
2iC: Captain Arrias Cordos
Mechanicum Liaison: Magos C’Ctics’Cston
Fleet Command: Sub-Admiral Theoion
Air command: Group Marshall Eddox
Corps Logisticae: Under-Marshall for the Supervision of Morossian affairs Yuri Yugvertchi

Despite General Verox being the key asset, loyalist forces were tasked with defending the population more generally. Several Iron Hands units refused this, but squad Berend took this missive to the extreme – laying down their lives to protect these inhabitants.
Several Iron Havoc units were identified during the assault, with their firepower crucial in pinning loyalist assets to suplant the traitor advance.

Warsmith Draxion Kord smiled a little as the Iron Hand in front of him collapsed under his thunder hammer. The joy was short-lived when he remembered how far the mission had gone awray. His carefully lain trap for General Sheev Verox of the 216th Expeditionary Fleet was thrown into chaos when Kaesoron and his cavoclade of madmen had rushed into the city intent on enslaving the citizens for throne only knows what. A lesser man would’ve felt pity for the fate of those enslaved by the Emperor’s Children, but Draxion only felt disgust at his ‘allies’ and what they had become.

Unsurprisingly the Emperor’s Children were attacked by the loyalist garrison, Iron Hands charging heedlessly to seek revenge whilst Arrios Cordos and his Ultramarines cut into Kaesoron’s terminators.

Draxion had been on his way to wrestle the Emperor’s Children from the plaza when a third force arrived – Raven Guard descending from orbit with thunderous fire. This renewed the loyalists and Draxion and Kaesoron were forced to withdraw.

Any hopes of unity amongst the Warmaster’s army were dashed when Kaesoron took his force into the manufactorum district to claim supplies, whilst Draxion regrouped to pursue the fleeing Verox. He was intercepted again and though he had cut down many loyalists, they had bought time for the Imperial Army high command to escape.

Still, this war was far from over, and Draxion had orders from the Warmaster’s counsel to bring this Sub-sector, and his ‘allies’ to heel. Xyphos must burn…

Warsmith Draxion Kord took a brutal approach to combat during the war. Many hypothesise that this was due to the Decimators – dispatched by Perturabo to keep an eye on the war and ensure its smooth progression.

“Emperor, why have you forsaken us?”

Looped vox message recovered from hab block Durangh, first victim to the Emperor’s Children assault.

Aftermath

Following this fighting, the traitors gained a nominal foothold on Moross. However their planned overrunning of the system was blunted by the loyalist marines, particularly the surprise counter-assault of the Raven Guard.

The war for Moross was merely the opening move in the next phase of war on Xyphos…

General Sheev Verox was secured and by the Ultramarines of the 77th Company. She would go on to call them her ‘Black Consuls’ after their black armour and dour attitude.

Dok’s Shop – Chapter Master Arrias Cordos

Given the Ultramarines legion went on to found so many chapters I wanted my 30k force to represent one such chapter. I could then tease that chapter’s history into its part of the wider legion (like FW did with the Aurora and Nemesis chapters) to show the kernals of the chapter that would become.

In another post I’ll explain why I ended up with the Black Consuls, but in this post I wanted to explain how I went about building Arrias Cordos, First Chapter Master and wielder of Lorgar’s Bane.

Planning Process

Step 1 involved doing as much research as possible about Arrias. This didn’t take long as there wasn’t much out there! It doesn’t even say when he took command of the company that would go on to become the Black Consuls. This was great news as my existing Ultramarines commander was called Cato Valerianus. It let me come up with the fluff that at the outbreak of the Horus Heresy Cato commanded the company, but was killed during the Shadow Crusade and Arrias Cordos took over then, directing the company further down the path of vengeance for Calth.

Captain Cato Valerianus, commander of the 77th Company of the Ultramarines during The Great Crusade.

As a result I had a lot of freedom to decide how I wanted him to look which was handy! The main thing that is known about him is he wielded an axe called Lorgar’s Bane (this had become a chapter relic by the 41st Millennium).

Not only did this mean that the model would need to have a suitably impressive axe, but also gave some indication of who Arrias was – I saw him as a vengeful man who was consumed by vengeance and on making Word Bearers pay for Calth and the wider Shadow Crusade. (Coincidentally this also helped flesh out my wider fluff for my Ultramarines – they are broken by grief and throw themselves headlong into battle against the Word Bearers in an attempt to make up for being absent at Calth).

Conversion work

Originally I planned to use the Fafnir Rann model as a base as he came with some suitably impressive axes. However when the Horus Heresy 2.0 boxed set came out I thought it more appropriate to use one of the new praetor models. This is because they have a bit more size and presence to them and I wanted Arrias to stand out in my army.

Having settled on the new praetor mini, I knew I wanted him to be bare headed, but I didn’t feel like the original head worked for how I pictured Arrias. I couldn’t find a suitable face for ages – until Forge World previewed their character heads upgrade heads – Tom suggested the scarred face would work and I agreed it was perfect! This would help push him as the grizzled veteran who cares more about vengeance than his own health.

Fafnir Rann didn’t go to waste however as I converted him into a dual wielding Champion. I kept one of his axes and then experimented with some different options for his off hand. Eventually I settled on using a spare power sword from the Ultramarines upgrade set.

There were a couple of Imperial Fist symbols to remove but I kept the ‘VII’ on his belt as luckily the Black Consuls were from the 7th Chapter. A crested Mk. III helmet finished the model off and should help him stand out as a character. As he has the same axe as the praetor model I converted for Arrias Cordos, I thought this model could be used to represent a younger version of him, prior to taking command of the 77th Company in games where I want to use Cato Valerianus as my warlord.

End Result!

So here is Arrias Cordos, captain of the 77th Company, Calth Ultor:

And here is Arrias Cordos, legion champion of the 77th Company:

Overall I’m super happy with both models. I feel I’ve managed to get some personality in the models, and having him at different stages of the Horus Heresy will be fun to have some extra setting for the games I play.

It was also a fun lesson in being flexible when it comes to conversions. Sometimes the idea you have going in doesn’t end up being the final result.

Now I just need to think of an epic battle in which Cato Valerianus dies!

Brushing Up: Gaunt’s Ghosts Speedpaint

Stu’s first foray into clearing his backlog with some quicker techniques

I get a lot of abuse for being a slow painter – and it’s (mostly) warranted. A combination of a lack of time and a tendency to spend ages trying to get the perfect paint job means that there’s a lot of unfinished models needing some much needed love. Recently playing some Marvel Crisis Protocol has reignited my passion for gaming and I love seeing fully painted minis on the battlefield (even if they aren’t perfectly done which let’s face it no models are). So I’ve decided to experiment with some faster techniques to see if I can get some of the backlog cleared out and have some pretty minis to game with, starting with….

Gaunt’s Ghosts! I loved reading the books and when the models came out a while back I had to buy them, but since then they’ve been sitting unbuilt in their box. They are well overdue being built and painted and so I thought I’d use them to experiment on with some faster painting techniques. I’ve recently read a lot about ‘slap chop’ style painting and also the ‘Army Painter Speedpaints 2.0’ and thought I’d pick some up and give it a try. Plus if this works I can blame the paints, not me, for my being such a slow painter in the past!

I wanted to experiment with just the speed paints (except for the base) and so didn’t let myself do any layering, washes or edge highlighting with other paints. The only paints I used were the speedpaint 2.0 ones. This was a bit awkward for a couple fine detail bits but I wanted to properly try out the paints and finish the minis with just them. I was really pleasantly surprised by the paints and really happy with the overall finish. There were some teething issues and with more practice with the paints I reckon I’ll get a much better finish. Here’s some tips and tricks I learnt along the way:

Here’s the finished unit – What do you think?

Tips & Tricks

  • Use a big brush. Smaller brushes result in a streaky look. You really want to lather the paint on for a smoother finish. Also it was a good challenge for my brush control using a larger brush than I would usually pick.
  • Paint quickly! The paint dries pretty quickly and once it starts drying you can’t go back over it without messing it up. Meant I made a couple mistakes here and there but with better brush control this is less of an issue. Plus the whole point of this challenge was to paint faster!
  • Use light colours first. This lets you get away with a couple mistakes here and there. The darker colour doesn’t always perfectly cover the lighter but it does a good enough job.
  • Trust the process. I thought a couple of paints looked too thin or odd when I painted them on. But as they dried they came together nicely.
  • Prime them with a colour you have the paint for! I primed them with the GW Grey Seer Undercoat as that’s what I had to hand. The main problems was I couldn’t paint back over any mistakes. Next time I will get the Matt White Army Painter Primer as it has a proper match with a paint too. This will make mistakes less painful!
  • You can mix colours. I wasn’t sure if this would work as they are a different formulation to normal paints but it worked out fine. For the fatigues I wanted a darker blue look than just the Beowulf Blue I got with the set. I mixed it 50:50 with the Grim Black and it turned out nicely in to a dark blue.
The paints I used from the set

Final thoughts

I really loved using these paints. They gave a great effect with very minimal effort. Also having to work quicker and with a bigger brush has challenged me to improve my brush control and should (I hope) make me a better painter over time. I will use these paints again for sure but will probably also use more standard paints too to add little highlights or details here and there. I can’t wait to try more colours out and see how it works on different models. Watch this space!

Stu.

Dicing with Death – War on Eryndor V

Esteemed Lord-Marshall, you asked me to prepare a dossier on the ongoing war on Eryndor V in the Ansham System. I have provided several sources below, but the overall tactical summary is that the strategic position has become more complicated, with forces from several legions now engaged on the planet. Given the importance of the planet’s promethium refineries, I can only predict further fighting and recommend the commitment of as much resources as you have spare.

Missive from Primus-Strategos Blazaar Dymov to Lord-Marshall Octavian II

Siege of Utrej-sak-Kherjak

The following is a secure message from the Horusian forces intercepted by vox-thief:

Planetfall M31.02001
Designation Utrej-sak-Kherjak, sub-set outta region and southern hemisphere of Eryndor V – Primary debrief of the Brotherhood of the Dawn Sky.

  • Key objective(s) – To secure imperial dramatis personae and extrapolate defence protocols for the sector.
  • Secondary objective – Assassinate Cato Valeranius – Ultramarines Captain of the 77th Company.
  • Tertiary objective- Null and void, dismissed infantry expendable as decreed by the Kharash under guise of the false Great Khan.

Hibou Khan led the task force setting out advance positions under the cover of darkness.

Initial pulmonary deathshot removing the heavy support squad sergeant by a calculated Vindicare snipeer. Remaining members take cover and minimal losses recorded (squad not pinned).

Ebon Keshig edged a flank on Praetorians, Contemptor and the opposing Warlord only to be quashed within -09.6 parsecs … Enacting an honourable death!

The trap sprung and the Ultramarines surrounded by deep striking assault marines, hailing bolt rounds, stood their ground in a tactical pear. Spearing a careful spread of consolidated fire from several units resulting in a massacre from self detonating and interconnecting propane.

The Ultramarines continued to press forwards, pressing the White Scars to their drop zone as dawn approached. The counter offensive was short lived as Cato Valeranius with his personal Suzerain cohort engaged Khan and his personal guard.

In a dual of skill, and exquisite blade against material defence, Khan delivered a murderous strike by kink under Cato’s left pauldron. A sigh of derision as Cato spun on his heel, dropped to one knee and passed seniority to Champion Cordos.

Seeing their commander fall but not embarred, the Ultramarines secured the extraction of 2 of 3 Expeditionary Fleet Logistic Officers and made way to regroup with the Raven Guard task force in the Northern Hemishere.

A successful Ultramarines defence and counter offensive…classic indicator of The Logos Lectora

+++ Tactical reticule – Intercepted +++

This report is from a stand in command Sergeant Octavius Tibon of the first squad, 77th Company and you’ll find out later in the report why Captain Cato Valerianus is not present.
It’s been many months on the world of Eryndor V and many more digging in to defend the city of Utrej-sak-Kherjak.
Me and brothers of the 77th company deployed for battle to defend the city and in recent weeks victory’s have been hard to find here for us loyalists.
Our orders were to find lost command structure of the 216th Expeditionary Fleet in the part of the city we lost ground in previous weeks gone by. They were scattered amongst the ruins of the ruined city landscape.
We set up ready for the counter attack heavier on the flanks, with two rhinos, one filled with tactical squad and the other filled with nemesis marines on the left and on our right flank we positioned our land raider with Cato Valerianus and his command squad of Invictarus Suzerain, accompanied by apothecary Maevius Tigo and a squad of praetorians on foot supported by a contemptor dreadnought.
Our centre was protected by a squad of 5 man heavy weapons team all with lascannons and a breacher squad who locked shields ready to hold the centre.
The enemy who we fought were the traitor sons of the khan and they made the first move…..

Keshig took their left flank and went straight for a building to hide like the cowards they are and then charged the praetorians and nearly saw them off of it wasn’t for the contemptor coming to their aid and help secure their designated objective.
One rhino was destroyed from a hail of fire from the scars autocannon squad at the back but luckily the squad had got out and secured the central objective.
The central breacher squad was jumped upon and stabbed in the back by the scars jump troops and the breacher squad was cut to ribbons, but they were revenged by working together to bring them down and force them to run away.

Then came the final fight Cato Valerianus charged head long into the fight straight for Hibou Khan, but alas the Khan was too skilled and struck the final blow under Cato’s left pauldron and his Invictarus Suzerain squad died to the last to protect their captains body.
Even with that dreaded blow the sons of Ultramar prevailed and held majority of the objectives and secured the majority of the lost command structure.

Courage and Honour
Long live the EMPEROR

War for the fuel

Report from the EFIC Interrogator Fgrei:

18h31. Interrogation commences on Prisoner 46.

23h59. Prisoner 46 resistant to initial interrogation. Advanced interrogation commencing.

04h42. Prisoner 46, confirmed as a member of the inner circle of the enemy force assaulting the EFLC Corps Supply Point Khajmuul, finally spoke.  [extra-interrogation note: the suspect used the term Esharu to refer to the enemy force]

The prisoner was told that the goal was to retake Khajmuul to gain access to the considerable promethium supplies in the depot. However he also overheard radio chatter with an unknown marine overlord who suggested that in fact the Esaru were used to draw marine elements away from Utrej-sak-Kherjak to aid in the decapitation strike attempt against the loyalist high command.

04h49. Prisoner 46 has died. Interrogation room cleared.

05h00. Interrogation commences on Prisoner 47.

Shadow-Captain Kraai. 8th Talon. Combat Log. M31.02001

Traitors assaulted the fuel depot.

Astartes presence was nil.

XIX assets deployed to counter the assault. Total success.

Enemies worthy of challenge, none.

Report from Mechanicum Adept O-Lëph:

Promethium assessment:

  • Total barrels lost: 22,411
  • Total barrels remaining: 4,563,999

Structural integrity: All major tanks are fully operational, one suffered minor damage but Omnissial blessings returned it to full capacity.

Biological remains: Substantial, 8,932 human wounded deemed adequate for thrall conversion.

Overall assessment: Acceptable.

01000010 01101100 01100101 01110011 01110011 01101001 01101110 01100111 01110011 00100000 01100110 01110010 01101111 01101101 00100000 01110100 01101000 01100101 00100000 01001111 01101101 01101110 01101001 01110011 01110011 01101001 01100001 01101000 00100000 01100001 01101110 01100100 00100000 01101000 01101001 01110011 00100000 01110011 01100001 01100011 01110010 01100101 01100100 00100000 01010000 01110010 01101111 01101101 01100101 01110100 01101000 01101001 01110101 01101101

Dok’s Shop – Ultramarines Nemesis Destroyers

Our recon forces have confirmed the Fleet’s intelligence report. Lorgar is here.”


The room stilled at this dire news and all bar one of the assembled Ultramarine officers were silent. Sergeant Taius Macrian’s pacing continued unaffected, his fists clenching so hard his suit’s servos were straining under the effort.


Well what is there to discuss? We are here, we attack.” he stated gruffly through his vox grill. No one else wore their helmet to the briefing, but Macrian had not been seen without his in some while.


Consider the practical Taius”, Arrias responded, attempting to soothe the choler in his battle-brother, “assaulting a primarch’s force head on without a plan is suicide.”


What does that matter? We are all on borrowed time as it is, and we owe a debt for our absence on Calth. Spend your time discussing plans Arrias, I will see you planetside standing on that traitor’s corpse, or you will add my name to the roll of honoured dead in this ship. I care not either way.”

When the rules for Nemesis Destroyers were released, I knew they would fit in perfectly with my Ultramarines army. The rules are cool, I love the idea of the harrower bolters being a true Ultramarine approach to destroyers. Also it would let me give Tom a taste of his own medicine when I utilise chemical warfare against his Raven Guard destroyer company!

Squad Macrian of the Ultramarines 7th Chapter, 7th Company, known as the Black Consuls

Making the models

As there are no official models for the Nemesis Destroyers, it meant my favourite thing – conversion time! Fortunately the process for this was straightforward: use the existing Destroyer models as a base and add bolter arms from my bits box.

You can see that I used a combination of plastic and resin bits to upgrade the regular destroyer kit and ensure they all had bolters.

As a result of this scrounging the arms are a mix of heresy mark 3 and 4 arms along with some 40k Death Guard pieces with different types of bolters thrown in as well. Whilst initially unintended, I love how this looks and it fits into the fluff for this unit. The squad draws marines from across the whole company and are only focused on being battle-ready. As such they are more than willing to scrounge replacement parts wherever necessary.

Painting

When it came to painting I knew they should have black armour. Not only does this reflect the depictions of destroyers in the various Forge World books (including the nemesis chapter themselves), but also ties really nicely with the fluff for my force. This is because all my marines have some part of their blue armour painted black – for them it is a sign of mourning as they were absent from Calth during the betrayal. The company sees this absence as a mark of dishonour and wear black for their shame. I had the idea that this squad was made-up of those particularly forlorn marines, those most broken by betrayal and most consumed by vengeance. This means they are less usable from a tactical perspective, and instead are used as a hammer by Arrias Cordos, the company commander, where more subtle approaches are not needed.

Two of the completed models showing off their battle damage!

The paint scheme itself was simple, being a mirror of my usual Ultramarine scheme (which is mainly blue but with a black arm) so that the destroyers were mainly black but with a blue arm. I had a go at adding extra battle damage to the models, both to show that they are in the thick of the fighting but also their attitude to their armour – they do not care how they look, only that they can fight.

This shows how the Nemesis Destroyers’ scheme is a mirror of my regular Ultramarines scheme. Whilst they are visually distinct, they are still tied together by a common style.

I will admit that I did not particularly enjoy painting these models until right at the end. I was not particularly motivated to paint them and so they sat for ages in a half finished state. Once I started weathering them I felt the models really come together and now I’m super happy with them – I just needed a bit of a push to get them over the line.

I’ve yet to get them on the tabletop, but fingers crossed I can get them into battle and see how they do! With leadership being less of a guarantee in this edition, maybe they’ll prove extra devastating…

Dok’s Shop – Lucifer Blacks

Hi everyone, I’ve been picking up GW’s monthly minis for a while now, converting them into different Militia units, such as the 710th Ironbacks. When the scout model was announced I thought it would make a good ‘elite’ unit with carapace armour.

Concept

I then thought it would be fun to model up a Lucifer Black. Being an elite unit that, by the Great Crusade, only operated as bodyguards to important Imperial officials, I thought it would be fun to include one in my Solar Command Squad. That way it meant I can use the model in game (most of the others sit on my display case) but would also add some fluff to my Lord Marshall – he is important (or politically connected) enough to warrant the extra protection.

Plan

So, with this idea, I went to the source material, flicking through my well-thumbed copy of Dan Abnett’s Legion.

Whilst they are described as wearing greatcoats (which the scout model is not), I figured that this could be explained by different environments and this more of a functional “battle gear” rather than ceremonial. I figured that this Lucifer Black is wearing a void hardened version of the greatcoat uniform so that he can keep up with the Solar Auxilia!

So when building the model, the key requirements were:

  • Be game legal, i.e. same equipment as a companion
  • He should be wearing black carapace armour
  • He should be suitably bling-y to represent his high status.

The first thing to go on the model was the chest winged-skull. I feel it’s too identifiable with 40k rather than 30k. It was a fairly straightforward process to scrape off with a sharp knife.

Likewise the arms and boltgun too clearly read Space Marine rather than regular human. It also was the wrong equipment for a bodyguard in a Solar Auxilia command squad. So I replaced with bits from the Death Korps of Krieg kit and a laspistol from the Solar Auxilia Command section. Given the width of the chest it was too difficult to make a pose where he was holding the rifle with both hands.

For the head I knew the scout head was a no go. I’ve wanted to use the Skitarii heads for some time and I thought it would work aesthetically here. However I wanted to bling up the helmet a bit – after all he is a bodyguard for the rich and famous. So I added the crest from the Solar Auxilia Command section which I think works nicely alongside. It didn’t take too much shaving to make work and I feel it helps make the model look nice and fancy.

As a late addition I thought it fun to add the medals from the Krieg veterans set. This would help add some bling factor and would also hint at his experience.

Painting

When it came to painting, the black carapace was a given. I tried adding some edge highlighting with greys but in the end it looked too much like I had overpainted from the grey fatigues so I left it.

With the rest of the model I wanted to make sure it fit within the palette of my army, so gloves, metal, leather and other bits were all painted in the same way as my Solar Auxilia.

Conclusion

I am really happy with him. I feel he stands out and looks suitably menacing without detracting from my Lord Marshall.

Magic the Gathering Secret Santa

With a rare meet up for the three of us earlier this month, we decided to do a MTG deck secret Santa this year, with each of us building a deck for someone else in the trio. The only stipulations were:

  • The value of the commander cannot exceed £5.
  • The value of the deck outside the commander cannot exceed £50.

We thought it would be fun to explain and give some tips on budget deck building, so check out our deck ideas below!


Stu’s Deck for Jamie

I was very excited for this challenge. I have lots of cool cards that I’ve been wanting to play around with but which don’t make the 99 in more competitive decks. However they would be perfect for this! I have a lot of cards from the Adventures of the Forgotten Realms set as that really helped consolidate my love for MTG and I cracked a lot of boosters at that time. I had always liked the idea of the ‘Party’ Cards but they seemed to struggle to fit other decks and I saw this as an opportunity to lean in to them. Not only are they cheap cards (which I already own most of!) but they have a unique play style and also reference Dungeons & Dragons which we all love playing.

My first thought was a mono black deck as basic lands don’t break the budget but then I thought it would be more fun with two colours to let me include more of the Party mechanic cards. I also remember Jamie loving the idea of ‘Background’ cards and thought this was the perfect chance to use one to introduce a second colour. I also love commanders that have some sort of draw a card mechanic which ‘Folk Hero’ does. ‘Burakos’ is really cool as he generates extra mana in the form of treasures (and these treasures also play into an aristocrats sub theme). He also most importantly counts as all of the ‘Party’ classes which helps a lot with the deck’s game plan.

This deck is a midrange deck which has a relatively low curve and likes to play out lots of cheap creatures – the vast majority of these are either ‘Clerics, Rogues, Warriors or Wizards’ which are needed to create the party and generate extra value. I was worried that this would be a bit inconsistent if Jamie drew several rogues but no warriors for example, so I added the ‘Changeling’ cards in to help smooth this out and build consistency – this was cool as I hadn’t used many of these cards previously. The deck also has some fun cards to buff up the board to hit for more damage with Mikaeus the Lunch, Jazal Goldmane and Mirror Entity all being able to buff the board whilst also being ‘Party’ members themselves.

The deck has an aristocrats sub theme to help punish opponents for killing off creatures and to help close the game out. Mirkwood Bats & Marionnette Master are in there to help add extra damage in for sacrificing treasures. Also there’s a few good aristocrats pieces that are within the ‘Party’ classes, eg Nadier’s Nightblade and Zulaport Cutthroat, so the sub-theme fits nicely alongside the deck’s primary game plan.

My deck also has an alternate commander, Nalia de’Arnise, who plays off the ‘Party’ mechanic in a different way for some added variety. She also is just a great card in the 99 and helps generate more value as well as pumping up the board.

Jamie’s first reaction: What a fun deck! The party mechanic is a cool one allowing some serious synergy within the cards which is very cool! Black is a colour that I really don’t play enough with and requires a bit of thinking around recursion and life management, but it’s been fun playing around with it more. Burakos’ ability to create a decent amount of extra mana every time it attacks really helps, though I did get a bit mana screwed in our first couple of games. Once it got going though it really became a monster in combat! Interestingly also Stu put a few shapeshifters in the deck which are great for giving me maximum flexibility when it comes to ensuring I have a full party.


Jamie’s deck for Tom

So the deck I built for Tom is Lulu, Loyal Holiphant paired with the background Cultist of the Absolute.

It’s an Orzhov aristocrats/go wide counters deck that is all about sacking or buffing tokens to grind out opponents. My reasons for doing so is I wanted something we’ve not seen before with the background mechanic (as a side note it’s funny that Stu built an Orzhov deck with a background- clearly we were on the same wavelength!). Additionally Tom doesn’t typically run black in his decks so I wanted to give him something different to try out.

My thought process with the deck was to turn the sacrifice cost in Cultist of the Absolute into a benefit for his deck, by ensuring the +1/+1 counters from Lulu always come online. I also added some cards that tap outside of combat and cards with etb effects so Tom feels less bad for sacrificing them as the card has already fulfilled its purpose!

When building the deck, my first step was going through cards in my binder. Doing so I found quite a few cards to fit the theme, and then it was a case of focusing the playstyle so it wasn’t too scattergun. I also thought it was important not to include too many colours as typically colour fixing lands are spenny. So to keep it simple whilst ensuring I had budget to spend on cool cards meant limiting it to one or two colours really. Finally, I thought it was better for a couple of ‘okay’ cards rather than one mega spenny card in the 98. Given the typical length of games, chances are Tom is not always going to draw that mega card and so the rest of the deck risks feeling lacking as a result. My final tip is to look for cards one level ‘lower’ than you may originally want. This is because lots of cards are good but are a lot cheaper because there’s a better, more spenny one out there that people typically pick for more competitive decks.

Toms first reaction: I’ve always wanted to build a background deck, so when I saw the commander/background combo, I was hyped to try it out! On top of that, I used to play a ton of Neverwinter on Xbox, and Lulu plays a big role in one of the quests, so having her as my commander felt like a fun nod to that. Trying to keep track of all the triggers was hilarious, and you could tell Jamie put a lot of thought into making the deck really synergize, which was awesome. We did notice it could use a bit more card draw, but overall, Jamie built me a seriously badass deck!


Tom’s deck for Stu


For my Secret Santa, I got Stu, which was a bit tricky. He’s got tons of decks and is always building new ones, so coming up with something unique was tough. But since he loves black and enjoys complex strategies, I decided to make a commander deck that fits his style. While going through my commander binder, I found Judith, Carnage Connoisseur and thought she’d be perfect.

The deck’s plan is to get Judith out and then cast lots of instants and sorceries. With Judith’s ability, each instant or sorcery can either gain deathtouch and lifelink or create a 2/2 red Imp creature token that deals 2 damage to each opponent when it dies. This helps control the board by reducing opponents’ creatures while also gaining life and making Imp tokens. I added several ways to take advantage of the Imps’ death triggers to make the deck more effective.

During playtesting, I realized I needed to adjust the number of instants and sorceries. Since Judith gives deathtouch to these spells, there were too many board wipes, which wasn’t ideal. After tweaking it, the deck ran more smoothly.

Seeing Stu’s reaction when he drew some of the deck’s cooler cards was awesome. I’m really looking forward to playing against this deck more in the future.

Stu’s first reaction: This deck slaps! And it’s a really cool deck to play with. It includes black which is my favourite colour but the commander leans in to a spellslinger style deck which I’ve not played around much with. The alternate commander, Torwaki is a lot of fun to play with and I’ve thought about building a deck for him for a long time. I really enjoyed giving spells death touch and wiping the whole board with a 1 damage ping spell (and also gaining a surprising amount of life). There’s some really fun instants in this deck as well as other payoff cards that damage opponents or generate more value from casting spells. I really enjoyed playing it and can’t wait for some more games. Gimli, Counter of kills ended up being a MVP in a couple games as he really punishes opponents for sacrificing things which Jamie & Tom’s decks are built around!


All images are taken from the Magic the Gathering card database – can be accessed at https://gatherer.wizards.com/Pages/Default.aspx

Midnight Moon Madness – Adventures in Marvel Crisis Protocol,

We met up recently and managed to squeeze in some MCP games. Neither of us have played in a while and were trying out new rosters. We tried to brief each other, including confirming that neither of us had any throws with our characters. Turns out we were both very wrong and, as you will read, used them to good effect in the game! The turn 0 conversation is only useful if you know what your own team actually does!

Don’t worry, I don’t have any throws in my list

Famous last words of Stu and Jamie, completely forgetting that in fact both of them have throws…

Team:

Both of the Crisis Cards we drew randomly were 15 threat missions so the threat level was already decided for us.

Stu brought Midnight Sons with Blade, Wolverine, Wong and Doctor Strange.

Jamie used Avengers with Steve Rogers Captain America, Iron Man, Vision and Captain Marvel.

Crisis Cards

Research Station Attacked & S.W.O.R.D Establishes Base on Moon’s Blue Area

Game Summary

The first round was largely focused on moving up to secure the objectives, with each claiming two S.W.O.R.D. bases. A last minute move from Iron Man ensured that the Avengers secured the Researcher but otherwise there were not many attacks other than Captain Marvel sending a warning blast of energy towards Doctor Strange.

The team leaders facing off in the middle of the board.

Things heated up in round two as Doctor Strange staggered Iron Man and damaged Captain Marvel. Vision’s beams and throwing of Wolverine did not do much due to some exceptionally poor rolls by Jamie! Wolverine showed how it was done by angrily leaping over Steve Rogers and aiming for Iron Man. However Captain America threw himself in the way, keeping Iron Man alive but getting dazed in the process. Finally in his smashing turn Wolverine made Iron Man bleed before bumping into range of the objective. 

Iron Man shook his stagger before unleashing homing rockets at Doctor Strange with the help of Friday AI. However he failed to do serious damage to Doctor Strange, who used mystic shields to block the damage. Blade hit Vision with his mystic katana, flipped the console to the Midnight Sons before bumping into the middle to trigger his vampiric immortality and heal off the bleeding Avengers.  Captain Marvel beat up Wolverine before slamming a building on top of him to daze him. Wong meditated and healed Doctor Strange. Whilst Iron Man held the Researcher, the Midnight Sons took control of the S.W.O.R.D. base. 

The Avengers had priority in turn 3 and Captain America started proceedings by throwing his shield at Wolverine but completely whiffed his attacks! Wolverine dazed Captain Marvel with his berserker barrage powered up by his wild rage. Then Stu activated the Siege of Darkness to let Doctor Strange and Blade Attack too, dazing Iron Man as well. Vision beamed and tried to throw Wolverine into Blade again but Stu used Brace for Impact to negate this.

Things were looking somewhat bleak for the Avengers at the start of Turn 4. Whilst Vision used Patch Up on Captain America and then triggered Avengers Assemble to reposition the team, Wolverine responded by killing Captain America with 10 damage in one attack!!! Iron man beamed Doctor Strange and Blade wounding them before pushing blade away from the action. Doctor Strange responded by killing Iron Man and retaking the S.W.O.R.D. base. For the last action of the round Captain Marvel swooped in and dazed Doctor Strange before throwing a car into Wong.

The dice roll that condemned Captain America

At that point it was clear where the game was going, with the Midnight Sons ahead both on the board and in terms of points. We therefore decided to call it there with a victory for the night boys!

Lessons Learnt

Stu used the place on Wolverine’s berserker barrage to great effect during the game, really helping bounce Wolverine round the board.

Jamie

MVP: Captain Marvel
I was very impressed with how the OG Captain Marvel plays. She was pretty mobile and vary capable of holding a flank by herself. Additionally her powers really benefitted from Captain America’s leadership ability reducing their cost and she was able to get some throws off to good effect.

Speaking of Captain America’s leadership – it is just a really good, if simple, leadership. Making superpowers cheaper makes all the difference (for example making bodyguard and Vision’s throw both cost only 1 power) and means you can be a lot more efficient in your plays. The Avengers Assemble card is really good, with the extra movement really handy for getting everyone in a better position – I used it to get Vision (with a stagger) and Iron Man in position to use some beams without having to spend an action moving. Overall I thought Iron Man was a bit underwhelming, but I also did not think that I played him super efficiently.
I was semi impressed with Vision (though the dice rolls let him down with his beam attacks). However I thought he was good at building power but did not have much of an outlet for spending it.

Vision being immune to Bleed really hampered Blade’s plans

Stu

MVP: Wolverine 
Especially on his damaged side. Who needs to contest objectives when you can throw 4 extra dice and shred enemies!

I really enjoyed playing with the Midnight Sons and was a nice change from my usual Asguardians of the Galaxy hybrid list. Still far from using them optimally but did learn a lot from the game.
Wolverine was my splash character and included based off the recent Midnight Sons comic run where he teamed up with Blade. He absolutely shredded enemies (with some lucky dice rolls helping out) and took a fair beating with his healing factor keeping him in the game. Wong didn’t attack once! But didn’t need to and his utility abilities of generating and passing power to others and healing up Doctor Strange were really useful. Loved using him and felt like 2 threat well spent. All my characters had only medium moves but ‘Bump in the Night’ ability gave them extra mobility and unpredictability and Wolverine had some surprising extra mobility with his Berserker Barrage ability.
I was really suprised by how tanky Steve Rogers was on his wounded side by adding blanks to successes, which also negated my pierce abilities on Wolverine and Blade. This coupled with his ability to bodyguard others and take their hits made him very powerful defensively and made it hard for my team to really ramp the pressure up and finish off characters.

Not even a vibranium alloy shield can protect you from a berserker barrage

Digging in – Siege of Vraks preparations

As we’ve posted before on our blog, we love the Siege of Vraks. We always planned on doing a bunch of Vraks themed projects this year, but it also coincidences nicely (and totally coincidentally) with a campaign being run of the Vets of Vraks Facebook group. We thought we would set out a few bits and pieces below to hopefully provide some inspiration for fellow Vraks enthusiasts!

Kill Team

Although from the previous edition of Kill Team, here are our first Vraks themed teams. Jamie used existing minis from his collection whilst Tom bought a new box to bulk out numbers for his Krieg.

Kill team is perfect for playing the trench raids, no man’s land incursions and other operations that were a daily occurrence on Vraks. The couple of games we played have shown how bloody a game it is, and it is fun how fast paced it can be (once you get a handle on the rules)!

A map of the board for Kill Team. We had to slightly adapt the rules for terrain to make the trenches effectively at a different level to the rest of the board otherwise everything was a little too open.

Each of us have been building Kill Teams, from the Bloodied and Veteran kill teams to Stu’s Apostles of Contagion and Jamie’s Red Hunters – we are determined to include some of the more niche factions as well.

One thing we want to explore is linking Kill Team missions with a separate full scale game. This way the result of the Kill Team can impact the advantages either side gets in the main game (for example cutting more gaps through barbed wire or taking out sentries to advance closer undetected).

Full Scale War

For the various pushes and counter-assaults there’s nothing better than full games of 40k. However, rather than play with the current edition, as the Death Korps of Krieg Siege Regiment and the Renegades and Heretics lists from Imperial Armour 15 have more flavour we have decided to use these. They keep the platoons and orders system from 7th edition that just feel right when it comes to the siege.

No surprise this ended badly for the Krieg squad…

So our plan is to use the rules from Horus Heresy (as they are an update to 7th ed) and all the relevant codices from 7th edition of 40k (so Space Marines, Grey Knights, Inquisition, Chaos Space Marines and Chaos Daemons). We may need to tone some things down (looking at you formations…) and we also want to include some things from the earlier Siege of Vraks books that did not make it to the 7th ed codex, such as Apostate Preachers and Commissar Tanks.

Artillery are going to play a big role in games – as they should!

We have already played one game using this format which you can read about here. Hopefully we will have a few more games played soon and then we can post some more reports!

Terrain

During lockdown we spent some time painting up a bunch of terrain including razorwire, tank traps and minefields. Coupled with aegis defence lines and walls of martyrs we can build nice looking boards.

The first minefield we built. The goal is for the defender to place down markers that, when the attacker gets close to, can either be a minefield, booby trap or just nothing.

However, we’re also super extra and so have decided to start working on a full 6×4 trench board. This will be broken into four separate 3×2 boards to both give us flexibilty of set up and so we can play Kill Team. We don’t want to give too many spoilers away but hope to be able to share some works in progress shots soon!

Tom, Stu and Jamie